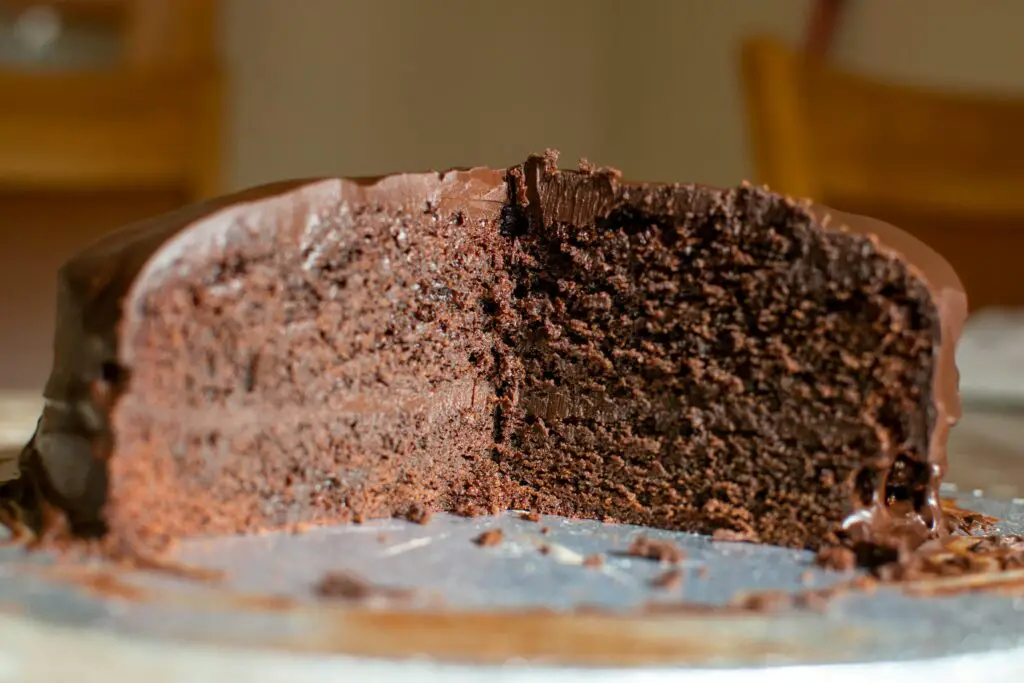
Ever bitten into a chocolate cake that looked like heaven—but tasted like a sponge that forgot its job? Yeah, we’ve all been there.
The truth is, making a moist chocolate cake isn’t just luck. It’s a little science, a few secret ingredients, and knowing when to stop mixing like you’re mad at the batter.
If you’ve been chasing that perfect, rich, tender, melt-in-your-mouth kind of slice… you’re in the right place.
This post breaks down exactly how to bake a moist chocolate cake every single time—no dry crumbs, no guesswork, just pure chocolate bliss. Let’s dive in!
Common Mistakes That Make Cakes Dry
Even the most beautiful chocolate cake can betray you with one dry bite. If you’ve ever followed a recipe to the letter and still ended up with something that crumbles like sand, the problem might not be your oven—it could be one of these common baking missteps.
1. Overbaking (Time & Temperature Trouble)
This is the biggest culprit. Bake it even a few minutes too long, and your cake will dry out faster than a forgotten slice on the counter.
Ovens lie. Yours might say 350°F, but it could be running hotter or colder without you knowing. Always use an oven thermometer if you can. And don’t just trust time—test for doneness around the earliest suggested bake time.
Insert a toothpick into the center. If it comes out with a few moist crumbs (not wet batter), it’s ready. If you wait for a clean toothpick, you’ve already gone too far.
Tip: Set a timer for 5 minutes before the recommended time. Better safe than sorry.
2. Using the Wrong Flour (Or Measuring It Wrong)
All flour is not created equal. Use bread flour by mistake? Expect chew. Use too much flour? Say goodbye to softness.
Cake flour or all-purpose flour is best for a tender crumb. And always measure carefully. Scooping flour directly with the measuring cup packs it down like concrete. Instead, spoon the flour into your cup and level it off with a knife. Or better yet, use a kitchen scale and avoid the guessing game altogether.
Too much flour dries the batter. Too little, and your cake might collapse. It’s a balancing act—but once you master it, your cakes will thank you.
3. Skimping on Fat (Butter, Oil, or Both)
This isn’t the time to go “healthy.” Moisture comes from fat. No way around it.
Butter gives flavor, but oil gives moisture. If you cut back on either one, you’ll feel it in the texture. Some recipes even use both—because each does something different.
Butter gives a rich mouthfeel. Oil keeps the crumb soft and spongy, even after a few days.
Trying to lower calories by reducing fat is like trying to fly a kite with no wind. The lift just isn’t there.
4. Not Balancing Wet-to-Dry Ingredients
A perfect cake batter isn’t too runny or too thick—it should fall like slow ribbons when you lift the spoon. That’s your golden consistency.
Too much dry? Your cake will be stiff and crumbly. Too much wet? You might get a soggy center that never fully bakes. Either way, it’s a letdown.
Follow ratios closely. And remember: things like cocoa powder soak up more liquid than flour. If you’re tweaking a recipe or swapping ingredients, you need to rebalance the wet-to-dry or risk cake chaos.
5. Skipping Moisture-Locking Ingredients
There are some ingredients that quietly rescue your cake behind the scenes.
Eggs bind and hold moisture. Yolks, especially, add richness. Sour cream, buttermilk, and even Greek yogurt bring in acidity, which tenderizes the crumb and keeps it lush.
These aren’t just bonus extras—they’re essential players.
Leave them out, and you’re setting yourself up for heartbreak. Dry, forgettable cake heartbreak.
Think of these ingredients like insurance for your bake. They don’t just add flavor—they keep the texture soft, even after a day or two in the fridge.
The Moisture-Locking Ingredients That Work Like Magic
If dry cake is the villain of the story, these ingredients are your Avengers. They’re the quiet heroes behind every soft, rich, unforgettable slice.
Used correctly, they transform your batter from “meh” to “moist masterpiece.” Let’s break them down one by one.
A. Buttermilk or Yogurt
Ever wondered why some cakes taste extra tender? Buttermilk or yogurt is usually the secret.
These ingredients do two things incredibly well: they add moisture, and they tenderize. Their slight acidity breaks down gluten strands, giving your cake a softer, finer crumb. It’s like giving your batter a mini massage before it hits the oven.
Buttermilk adds a subtle tang that balances the sweetness of the chocolate. Greek yogurt does the same, with bonus creaminess. You can usually swap them 1:1 in a recipe.
No buttermilk? Add 1 tablespoon of vinegar or lemon juice to 1 cup of milk. Let it sit for 5–10 minutes. Boom—DIY buttermilk that works like a charm.
B. Oil Instead of Butter (Or a Mix of Both)
Butter tastes amazing—but oil? Oil keeps your cake soft.
Here’s why: butter solidifies at room temperature. Oil doesn’t. So when your cake cools, that oil is still flowing through the crumb, keeping it tender and moist.
Many of the moistest chocolate cake recipes use all oil (usually canola or vegetable). Some go half and half—oil for texture, butter for flavor.
Avoid strong-flavored oils like olive or coconut unless the recipe says so. You don’t want your chocolate cake tasting like a salad.
C. Brown Sugar
Brown sugar is more than just sweet—it’s a moisture magnet.
Thanks to the molasses, brown sugar retains more liquid than white sugar. That means softer texture, richer flavor, and a cake that stays moist for days.
It also adds a touch of caramel depth that plays beautifully with chocolate. You can replace some or all of the white sugar in your recipe for an extra boost of richness.
Just don’t overdo it unless you love dense cakes. A 50/50 blend is usually the sweet spot (pun intended).
D. Eggs (Especially Yolks)
Eggs are the glue that holds your cake together. But yolks? They’re the golden ticket to moisture.
Yolks are rich in fat and help emulsify everything—fat, liquid, and sugar—into a smooth, velvety batter. They give your cake structure and tenderness.
Some recipes even add an extra yolk for more richness. It’s a tiny change that makes a big difference.
Pro tip: Always use room temperature eggs. They mix better and trap more air, which helps your cake rise evenly.
E. Hot Coffee or Boiling Water
This one sounds weird—until you try it.
Adding hot coffee or boiling water to your chocolate cake batter does three amazing things:
- It “blooms” the cocoa, making the chocolate flavor deeper and more intense.
- It thins the batter slightly, which gives you a lighter, more tender crumb.
- It adds heat, which jump-starts the baking soda or powder, helping your cake rise better.
Don’t worry—your cake won’t taste like Starbucks. The coffee just deepens the chocolate. If you’re not a coffee fan, use boiling water instead. Still works. Still delicious.
The Perfect Mixing Technique
How you mix your cake batter matters just as much as what goes into it—maybe even more. Let’s start with the two common methods: creaming and the one-bowl approach.
Creaming involves beating butter and sugar together until light and fluffy, which traps air and helps the cake rise.
It’s great for a classic texture, but you’ve got to do it right—room temperature butter, not melted or cold, and enough beating time to get that pale, airy consistency.
On the flip side, the one-bowl method is a dream for busy bakers. You mix your wet and dry ingredients separately, then combine them quickly with minimal effort.
It’s faster, simpler, and surprisingly effective—especially for oil-based chocolate cakes where tenderness is the goal.
Now, a quick word of warning: overmixing is your cake’s worst nightmare. Stir too much after combining the wet and dry, and you’ll develop the gluten in the flour.
That’s great for bread, terrible for cake. The result? A dense, chewy texture that no amount of frosting can save.
Instead, mix just until the ingredients come together—no streaks, no clumps, and definitely no marathon whisking sessions.
And when adding delicate ingredients like whipped egg whites or melted chocolate, fold gently. Use a spatula and make slow, sweeping motions from the bottom of the bowl up.
You’re not wrestling the batter—you’re coaxing it.
This keeps the air inside, which means a fluffier, lighter cake that still holds onto its moisture like a sponge (but, you know, the good kind).
Think of mixing as your cake’s first impression: too rough, and it clams up; just right, and it shines.
Bake Smart, Not Just Fast
Rushing through the baking process is like speed-reading a love letter—you’ll miss the magic.
Even if your batter is perfect, one wrong move in the oven can turn your dream cake into a dry, crumbly regret.
Baking smart means treating your oven like a partner, not a microwave. Here’s how to get it right from the moment you preheat to the second you test for doneness.
A. Oven Temperature Tips
Stick with 325°F or 350°F—those aren’t just random numbers. They’re the sweet spot for chocolate cakes. Higher temps cook the outside too fast and leave the middle raw or sunken.
Lower temps might seem safe but can make your cake dry out before it’s even fully baked. Also, ovens lie. Yours might say it’s 350°F, but it could be running 25 degrees off in either direction.
That’s why an oven thermometer is a must-have tool. It’s cheap, but it saves cakes. And always preheat—baking in a cold oven is like jumping into a pool before it’s filled. It won’t end well.
B. Parchment Lining + Pan Prep
Greasing your pans is basic. Lining them with parchment paper? That’s smart baking. Parchment acts like a non-stick insurance policy.
No more scraping the bottom or peeling cake chunks off the sides. And when your cake slides out clean, you don’t have to risk overbaking it just to make sure it “comes loose.”
You’ll also avoid over-greasing, which can sometimes fry the edges of your cake and make it tougher. Just grease, line, and move on.
Bonus: it makes cleanup easier, which means less time scrubbing and more time licking frosting off the spatula.
C. Don’t Overbake
This is the final fork in the road—moist cake heaven or Sahara desert vibes. Don’t rely solely on the timer. Your eyes, nose, and toothpick are better tools.
Start checking 5–10 minutes before the recipe’s lowest time. Insert a toothpick into the center of the cake. If it comes out with moist crumbs (not batter, not bone-dry), it’s done.
If you wait until it’s squeaky clean, you’ve already passed the perfect moment. The cake will keep cooking a bit as it cools in the pan.
Remember: it’s easier to fix an underbaked cake (pop it back in) than to save one that’s dry as dust. Trust the crumbs—they won’t lie to you.
Pro Tricks for Extra Moisture
Want to take your chocolate cake from “wow” to why-is-this-so-good-I-need-another-slice? These little tricks aren’t just baker’s secrets—they’re game-changers.
They lock in moisture long after the oven’s cooled down. And they’re so simple, you’ll wonder why no one told you sooner.
Add a Syrup Soak (Sugar + Water + Coffee or Vanilla)
This trick comes straight from professional pastry kitchens—and it’s pure gold.
A syrup soak is exactly what it sounds like: a quick mixture of sugar and water (equal parts), sometimes with a splash of coffee, vanilla, or even a touch of rum.
You brush it lightly over each cake layer before frosting. It doesn’t make the cake soggy—it just sneaks in extra moisture and flavor.
It’s especially helpful if your cake was in the oven a minute too long or you’re baking ahead of time.
One swipe of syrup, and suddenly your cake feels like it came fresh from the oven this morning.
Frost While Slightly Warm for Lock-In Effect
Here’s a sneaky way to trap moisture where it belongs—inside the cake. Once your cake has cooled just enough to handle but is still slightly warm, apply a thin layer of frosting (or a “crumb coat”).
This creates a seal that keeps steam from escaping. It’s like tucking your cake into a cozy blanket while it rests. Just don’t go full buttercream frenzy while the cake’s still hot—you’ll melt everything into a sweet disaster.
But that gentle warmth? It helps the frosting spread like a dream and keeps your cake soft as a pillow.
Store in an Airtight Container or Wrap While Warm
Air is your cake’s enemy. The more contact it has with dry air, the quicker it starts to turn stale.
That’s why pros wrap cakes while they’re still slightly warm—not hot, but not fully cooled either. Use plastic wrap or pop it in an airtight cake container.
This traps in all that natural steam and keeps the crumb moist.
If you’re not frosting it right away, this step is non-negotiable. Letting it “breathe” on the counter overnight is a rookie mistake unless you enjoy eating chocolate-scented cardboard.
Chill Overnight (Flavor Deepens + Keeps Moist)
This one might sound backwards, but trust the process. Once your cake is wrapped or frosted, chilling it overnight can actually help with both moisture and flavor.
The ingredients settle, the chocolate flavor gets deeper, and the texture evens out. When you slice into it the next day, you’ll notice the difference.
The cake feels denser—but in the best, fudgy, bakery-style way. Just let it sit at room temp for 30 minutes before serving, and it’ll taste like you just pulled it out of the oven.
Foolproof Moist Chocolate Cake Recipe (Quick Version)
Ready to put all that knowledge into action? Here’s a simple, no-fuss recipe that checks every box for a rich, incredibly moist chocolate cake.
No fancy mixers, no weird ingredients—just a solid one-bowl wonder that never fails. Great for birthdays, cravings, or any random Tuesday that needs chocolate.
Moist Chocolate Cake (One-Bowl Style)
Ingredients:
- 1¾ cups all-purpose flour
- ¾ cup unsweetened cocoa powder
- 1½ teaspoons baking powder
- 1½ teaspoons baking soda
- ½ teaspoon salt
- 1 cup brown sugar (packed)
- ¾ cup white granulated sugar
- 2 large eggs (room temp)
- 1 cup buttermilk (or plain Greek yogurt)
- ½ cup vegetable oil (or canola oil)
- 2 teaspoons vanilla extract
- 1 cup hot coffee (or boiling water for non-coffee folks)
One-Bowl Method:
- Preheat your oven to 350°F (175°C). Grease and line two 8-inch round cake pans with parchment paper.
- In a large mixing bowl, whisk together the flour, cocoa powder, baking powder, baking soda, salt, and both sugars.
- Add the eggs, buttermilk, oil, and vanilla. Mix until smooth—don’t overdo it.
- Carefully pour in the hot coffee (or boiling water). The batter will be thin—that’s perfect.
- Divide the batter evenly between the pans.
- Bake for 30–35 minutes, or until a toothpick inserted comes out with moist crumbs (not wet batter).
- Let the cakes cool in the pans for 10 minutes, then transfer to a wire rack. Wrap or frost while slightly warm to lock in moisture.
Pan Suggestions:
- Makes two 8-inch round cakes (perfect for layering)
- Or use a 9×13-inch sheet pan for an easy party cake
- Halve the recipe for a small batch or cupcakes (about 12–14)
Final Words
Moist chocolate cake isn’t magic—it’s smart baking. The right ingredients, a gentle hand, and perfect timing are all it takes.
Now it’s your turn. Try the recipe, test the tips, and let your oven do the talking.
Snap a pic, share your masterpiece, or drop a comment if it changed your cake game!
FAQs
“Can I make it without eggs?”
Yes, but you’ll need a reliable substitute. Try using ¼ cup of unsweetened applesauce, mashed banana, or plain yogurt per egg.
For a richer texture, a flaxseed egg (1 tbsp flaxseed + 3 tbsp water) also works well. Just know the texture might be slightly denser, but still delicious if the other moisture-locking steps are followed.
“Can I use almond or oat milk instead of buttermilk?”
Absolutely—with a twist. Since buttermilk is acidic, you’ll need to mimic that effect. Add 1 tablespoon of vinegar or lemon juice to 1 cup of almond or oat milk.
Let it sit for 5–10 minutes to curdle slightly. This DIY buttermilk keeps the cake tender and helps balance the flavors, just like the real deal.
“How do I store it to stay moist for days?”
Wrap the cake tightly in plastic wrap while it’s still slightly warm, or store it in an airtight container. Keep it at room temperature for up to 3 days.
For longer storage, refrigerate it—just make sure it’s sealed well to prevent it from drying out. Let it come to room temp before serving for the softest texture.
“What frosting pairs best with a moist chocolate cake?”
You’ve got options—and none of them are wrong. A silky chocolate ganache adds richness without overpowering.
Cream cheese frosting gives you a tangy contrast that complements the deep chocolate. Peanut butter frosting? Game changer.
And if you’re keeping it simple, a whipped vanilla buttercream always plays nice. Pick your vibe and go for it.