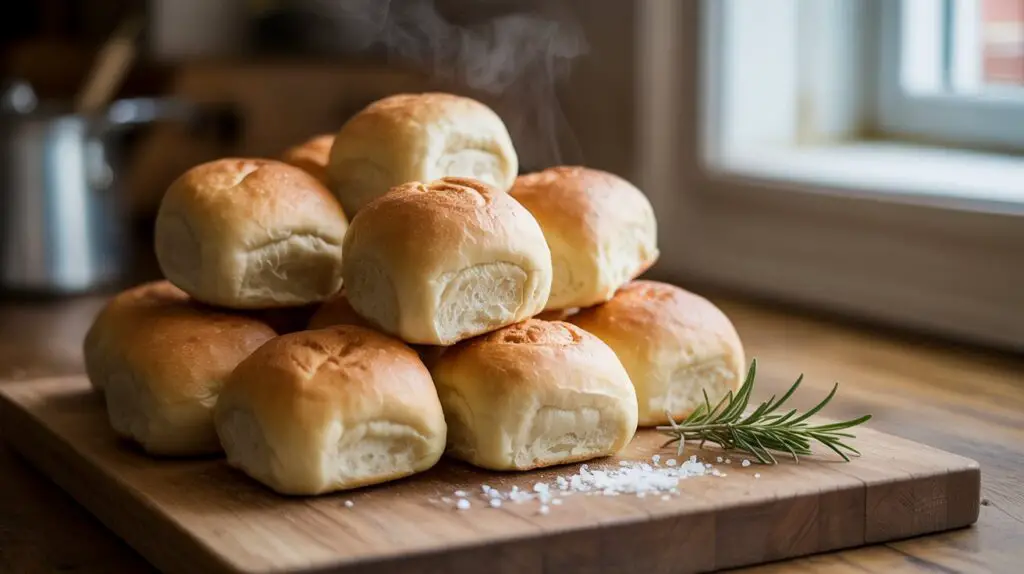
There’s nothing like tearing into a warm, soft dinner roll. Golden on the outside, fluffy on the inside—it’s comfort food at its finest.
The good news? You don’t need to be a pro baker to get it right.
In this post, I’ll walk you through the exact ingredients, simple techniques, and foolproof tips to bake rolls so soft, you’ll want to nap on them.
Let’s roll!
What Makes Dinner Rolls Soft and Fluffy?
Soft and fluffy dinner rolls aren’t just happy accidents—they’re the result of a few key baking science tricks working together behind the scenes. First up is gluten development.
Gluten forms when flour meets liquid and gets worked through kneading. Think of it as the stretchy net that traps air and gives rolls their pillowy structure.
Without it, you get dense, sad little pucks. Then there’s fat—like butter or oil—and rich dairy ingredients like milk or eggs.
These add tenderness, flavor, and moisture. Milk also gives the rolls a softer crumb and a beautiful golden crust. Moisture matters more than you’d think.
A slightly sticky dough means a higher hydration level, which leads to a softer texture.
But you still need proper kneading to bring it all together—enough to build strength, but not so much you tire out your arms or overwork the dough.
Lastly, don’t skip the proofing. That’s when the yeast does its magic and the dough doubles in size. It creates those little air pockets that make rolls light and airy.
And if you want a bakery-style finish? Add a bit of steam during baking or keep them covered while cooling. It locks in that dreamy softness that makes you reach for seconds (or thirds).
Ingredients You’ll Need
Here’s a clear breakdown of what you need to make soft, fluffy dinner rolls from scratch:
- Flour:
- 3 ½ cups all-purpose flour (for soft texture)
- Optional: Use bread flour for a chewier roll with more structure
- Yeast:
- 2 ¼ teaspoons (1 standard packet) active dry yeast
- Can substitute with instant yeast (no need to activate in liquid)
- Sugar:
- 2 tablespoons granulated sugar
- Feeds the yeast and helps with browning
- Milk (or water):
- 1 cup warm whole milk (110°F) for richer, softer rolls
- Substitute with warm water if needed (but milk gives better results)
- Butter (or oil):
- ¼ cup unsalted butter, melted
- Can use neutral oil (like canola or vegetable) for a dairy-free option
- Egg (optional):
- 1 large egg
- Adds richness, moisture, and golden color
- Salt:
- 1 teaspoon fine sea salt or table salt
- Essential for flavor and yeast balance
Bonus: Ingredient Substitutions
- Dairy-Free:
- Replace milk with almond, oat, or soy milk
- Use vegan butter or oil in place of butter
- Egg-Free:
- Skip the egg entirely
- Or use 1 tablespoon flaxseed + 3 tablespoons water (let sit 5 minutes)
- Alternatively, use 3 tablespoons plain yogurt or applesauce
Step-by-Step Instructions
This is where the magic happens. Follow these steps closely, and you’ll be pulling out soft, golden rolls that’ll have people thinking you’ve got a secret family recipe (we won’t tell).
1. Activate the Yeast
If you’re using active dry yeast, it needs to wake up first. Warm 1 cup of milk until it’s around 100–110°F—think warm bath, not scalding.
Stir in 2 tablespoons of sugar, then sprinkle in 2¼ teaspoons of yeast. Let it sit for 5–10 minutes until it’s foamy and bubbly.
That’s the yeast saying, “I’m alive!” If you’re using instant yeast, skip this step and mix it straight into your dry ingredients.
2. Mix the Dough
In a large bowl, combine your yeast mixture (or the milk if you’re using instant yeast) with 1 beaten egg (if using), ¼ cup melted butter, and about 3 cups of flour to start.
Add 1 teaspoon of salt. Stir with a wooden spoon or dough hook until the dough starts to come together.
Then gradually mix in the remaining ½ cup of flour, just enough so it’s tacky but not a sticky mess.
3. Knead Until Smooth
Now it’s time to knead. If using your hands, turn the dough out onto a lightly floured surface and knead for 8–10 minutes. It should feel soft, elastic, and bounce back when poked.
If using a stand mixer with a dough hook, knead on medium speed for 5–6 minutes.
Not sure it’s ready? Try the windowpane test: stretch a small piece of dough—if it stretches thin without tearing and you can see light through it, you’re golden.
4. First Rise (Proof #1)
Grease a clean bowl and place the dough inside. Cover it with a clean kitchen towel or plastic wrap. Let it rise in a warm, draft-free spot for 1 to 1.5 hours, or until it has doubled in size.
Pro tip: the inside of a turned-off oven with the light on is a cozy place for dough to rise.
5. Shape the Rolls
Once your dough has puffed up, punch it down gently to release excess air. Divide it into 12 equal pieces using a bench scraper or knife.
Roll each piece into a smooth ball by tucking the edges under and pinching the seam. Place them in a greased 9×13-inch baking dish, spacing them slightly apart.
6. Second Rise (Proof #2)
Cover the rolls again and let them rise for another 30–45 minutes, until they’ve doubled and are touching or nearly touching each other.
They should look puffy, like soft clouds ready to bake.
7. Bake to Perfection
Preheat your oven to 375°F (190°C). For that extra golden finish, brush the tops with milk, melted butter, or an egg wash (1 egg + 1 tablespoon water).
Bake the rolls for 18–22 minutes, or until the tops are golden brown and sound slightly hollow when tapped.
Remove from the oven and brush again with butter while they’re hot—because why not? That glossy finish is irresistible.
Tips for Success
Want next-level dinner rolls? These tips make the difference between “pretty good” and “people ask for your recipe at every family gathering.” Trust me, these small details matter.
How to Know When the Dough Is Kneaded Enough
Kneading helps develop the gluten, which gives your rolls their structure and fluff. But how do you know when to stop? Easy: use the poke and stretch tests.
First, poke the dough—if it springs back slowly, it’s ready.
Second, tear off a small piece and gently stretch it between your fingers. If it forms a thin, see-through “windowpane” without tearing, you nailed it.
Too sticky? Add a sprinkle of flour. Too dry? You went overboard. It should feel smooth, elastic, and a little tacky—not like Play-Doh, but close.
Tricks for Keeping the Rolls Extra Soft
Here’s a pro move: as soon as your rolls come out of the oven, brush them with melted butter. Then cover them loosely with a clean kitchen towel as they cool.
Why? The towel traps steam, keeping the crust soft and tender instead of drying out.
You can also place a small pan of water on the lower oven rack while baking—this creates a bit of steam, which keeps the tops from forming a hard crust.
Think of it like a mini spa for your bread.
Best Size and Spacing for Even Baking
Uniformity is key. Divide your dough into equal portions—a kitchen scale helps if you want them identical (aim for 60–70g per roll). Place them close together but not touching in the pan.
Why? As they rise and bake, they’ll puff up into each other and bake evenly, staying moist in the middle.
Too far apart, and they’ll bake individually and dry out faster. Too close, and they won’t get that classic rounded top. Aim for that sweet spot where they snuggle but don’t smother.
Using a Thermometer to Avoid Over/Underbaking
Here’s your secret weapon: a digital thermometer. Rolls should hit an internal temperature of 190–200°F (88–93°C) when done.
This ensures they’re cooked through but not dried out. If the tops are browning too quickly but the centers aren’t done, tent the pan with foil and keep baking.
This is especially helpful if your oven runs hot—or your guests are circling like vultures, waiting for fresh bread.
Variations to Try
Once you’ve mastered the classic dinner roll, it’s time to have some fun.
These tasty twists let you turn your basic dough into something that feels brand-new—without reinventing the wheel.
Below are a few easy, flavorful variations that’ll have people saying, “Wait… you made these yourself?”
Garlic Butter Rolls
Garlic lovers, this one’s for you. Right before baking, brush the tops of your shaped rolls with a mix of melted butter, minced garlic (1–2 cloves), and a pinch of salt.
Once they come out of the oven, hit them again with that garlicky goodness and sprinkle with chopped parsley or a little grated Parmesan if you’re feeling fancy.
It’s like garlic bread, but better—because it’s soft, warm, and homemade.
Honey Glazed or Slightly Sweet Rolls
For something a little sweeter (but not full dessert mode), add 2–3 extra tablespoons of honey to your dough when mixing.
This gives a subtle sweetness that’s perfect for brunch or holiday meals.
After baking, brush the tops with warm honey or a honey-butter glaze (just mix 1 tablespoon of butter with 1 tablespoon of honey).
These rolls are especially good alongside ham or roasted veggies.
Whole Wheat Dinner Rolls
Want to add a bit of wholesomeness? Replace up to half the all-purpose flour with whole wheat flour. Start with a 50/50 split so the rolls stay soft and not too dense.
You may need a touch more liquid (an extra tablespoon or two of milk) since whole wheat flour soaks up more moisture. A bit of honey or maple syrup can also help balance the nuttier flavor.
Cheese-Stuffed or Herb-Infused Versions
Stuffed rolls feel like a surprise party in your mouth. Take a cube of cheddar, mozzarella, or cream cheese, press it into the center of each dough ball, and seal it well before baking.
For a more subtle kick, mix dried herbs (like rosemary, thyme, or Italian seasoning) right into the dough—1 to 2 teaspoons goes a long way.
You can also sprinkle herbs or shredded cheese on top before baking. Either way, you get rolls with personality.
How to Store and Reheat
Homemade dinner rolls are best fresh, warm, and slathered in butter—but life happens.
Leftovers are inevitable, and if you store them the right way, they’ll still taste like they just came out of the oven.
Here’s how to keep that soft, fluffy magic going strong even days later.
Best Practices for Storing (Room Temp vs Freezing)
If you plan to eat the rolls within 2–3 days, store them at room temperature in an airtight container or zip-top bag.
Add a paper towel inside to absorb any excess moisture and prevent sogginess. Don’t refrigerate them—it dries them out faster than a desert wind.
For longer storage, freezing is your best friend. Let the rolls cool completely, then wrap them individually in plastic wrap and toss them into a freezer-safe bag.
They’ll stay good for up to 3 months. You can also freeze the baked rolls or the shaped, unbaked dough balls—just let them thaw and rise before baking as usual.
Reheating for Fresh-Out-of-the-Oven Softness
To bring your rolls back to life, skip the microwave if you want even heating and that gentle crust. Instead, wrap them in foil and warm them in a 350°F (175°C) oven for 8–10 minutes.
Want that “just baked” softness? Place a small cup of water in the oven to create light steam while reheating.
If you’re in a rush, the microwave can work—just wrap the roll in a damp paper towel and heat for 10–15 seconds. It’s not perfect, but it’ll do the trick in a pinch.
Can You Prep the Dough Ahead of Time?
Absolutely. Dinner rolls are surprisingly freezer- and fridge-friendly if you plan ahead. After the first rise, shape the rolls and place them in your baking dish.
Cover tightly and refrigerate overnight (up to 18 hours). The next day, let them come to room temperature and finish rising—usually about 1 hour—before baking.
You can also freeze the dough balls after shaping.
Just thaw them overnight in the fridge, proof as usual, and bake. It’s a great way to get that fresh-baked feel without starting from scratch on a busy day.
Common Mistakes to Avoid
Even the best intentions can lead to tough rolls or sad, doughy centers if you miss a few key details.
The good news? These slip-ups are easy to avoid once you know what to look for. Here’s how to dodge the most common dinner roll disasters.
Overproofing or Underproofing
Timing is everything. Let the dough rise too long, and it can collapse like a deflated balloon in the oven. That’s overproofing.
The yeast eats up all the sugar and loses strength, leaving your rolls flat and sad. On the flip side, underproofed dough hasn’t puffed up enough.
It bakes dense, heavy, and chewy—not in a good way. How do you know when it’s just right? Gently press the dough with your finger.
If the indentation springs back slowly and partially, it’s ready. If it springs back immediately, it needs more time. If it doesn’t spring back at all, it’s gone too far.
Too Much Flour
This one sneaks up on you. A dough that feels a bit sticky might tempt you to keep adding flour—but resist the urge. Too much flour makes tough, dry rolls that don’t rise well.
The dough should be slightly tacky to the touch, like Play-Doh that’s just a little warm.
If it’s sticking to your hands like glue, add a spoonful of flour at a time, but stop as soon as it’s manageable. Sticky dough bakes up soft. Dry dough? Not so much.
Cold Oven or Uneven Baking
An oven that isn’t fully preheated can wreck your rolls before they get a chance to shine. Cold ovens delay the rise, making rolls spread instead of puff.
Always preheat your oven to 375°F (190°C) before the rolls go in.
And use the middle rack—too close to the top and they’ll brown too fast, too close to the bottom and you risk burnt bottoms.
If your oven has hot spots (and most do), rotate the pan halfway through baking for even color and texture.
Not Kneading Long Enough
Under-kneaded dough doesn’t develop the gluten it needs to trap air and create that soft, bouncy structure. The result? Rolls that feel heavy and dense, like hockey pucks in disguise.
Knead until the dough feels smooth, elastic, and slightly stretchy.
Whether you’re doing it by hand or using a stand mixer, don’t rush it—those few extra minutes of kneading make all the difference.
Use the windowpane test or poke it gently—if it springs back, it’s good to go.
Serving Suggestions
Freshly baked dinner rolls are the kind of side dish that quietly steals the spotlight. They’re warm, buttery, and endlessly versatile.
Here are some delicious ways to serve them up.
Pairing with Soups, Stews, Roast Dinners
Dinner rolls are basically soup’s best friend. Dip one into a bowl of creamy tomato, hearty beef stew, or chicken noodle and watch it soak up all that flavor like a sponge made of heaven.
They’re also perfect for wiping your plate clean after a roast chicken, pot roast, or Sunday lamb.
Want to level up? Warm the rolls before serving and pass them with herbed butter or a little garlic oil on the side. It’s comfort food meets table elegance.
How to Make Sliders or Mini Sandwiches with Rolls
Got leftovers? These rolls are just begging to become sliders. Slice them in half and stuff them with roast beef, turkey, pulled pork, or even scrambled eggs and cheese.
Add a pickle or a swipe of mustard, and you’ve got yourself a snack, lunch, or party tray that disappears fast.
They’re soft enough to bite into without the filling squishing out everywhere—basically slider perfection. You can even prep a batch ahead and warm them up before guests arrive.
Making Them Part of a Holiday Meal Spread
Dinner rolls on a holiday table are non-negotiable. They’re the one thing everyone reaches for—twice. Serve them in a warm bread basket with a linen napkin to keep them soft.
Add whipped honey butter, cranberry spread, or a savory compound butter to give them a festive twist.
They pair with turkey, ham, gravy, stuffing—honestly, everything. And don’t be surprised if someone eats more rolls than dessert. It happens. Often.
Final Words
There’s something deeply satisfying about pulling warm, homemade rolls from the oven. Soft, golden, and made with love—they’re easier than you think and twice as delicious.
Don’t be afraid to mix things up with herbs, cheese, or a touch of honey.
Tried it? Snapped a photo? Tag us in your fluffy roll creations—we’d love to see them rise to the occasion!
FAQs
Can I use a bread machine or mixer?
Yes, absolutely. A stand mixer with a dough hook is a time-saver for kneading—just mix on medium speed for about 5–6 minutes until the dough is smooth and elastic.
If you’re using a bread machine, toss everything in according to your machine’s instructions and use the dough setting.
Once it’s done, shape and bake as usual. Let the machine do the heavy lifting while you prep the baking dish.
How do I make rolls ahead of time?
You’ve got options. After the first rise and shaping, you can refrigerate the dough overnight—just let the rolls come to room temp and finish rising before baking.
Or freeze the shaped dough balls and thaw them in the fridge the night before you need them.
You can also fully bake the rolls ahead of time, then reheat before serving for that fresh-baked vibe.
What’s the best flour to use for the softest result?
All-purpose flour works great and gives a soft, tender roll. But if you want a little more chew and structure, you can use bread flour.
It has more protein, which helps develop stronger gluten strands. You can even mix the two for a happy medium. Avoid cake or pastry flour—they’re too light for this kind of dough.
Can I freeze the dough or baked rolls?
Yes to both. For dough, shape the rolls, freeze them on a baking sheet, then transfer to a freezer bag. When ready to bake, thaw overnight in the fridge, let them rise, and bake as usual.
For baked rolls, let them cool completely, then wrap and freeze for up to 3 months. Reheat in the oven (wrapped in foil) until warm and soft again. Easy peasy.