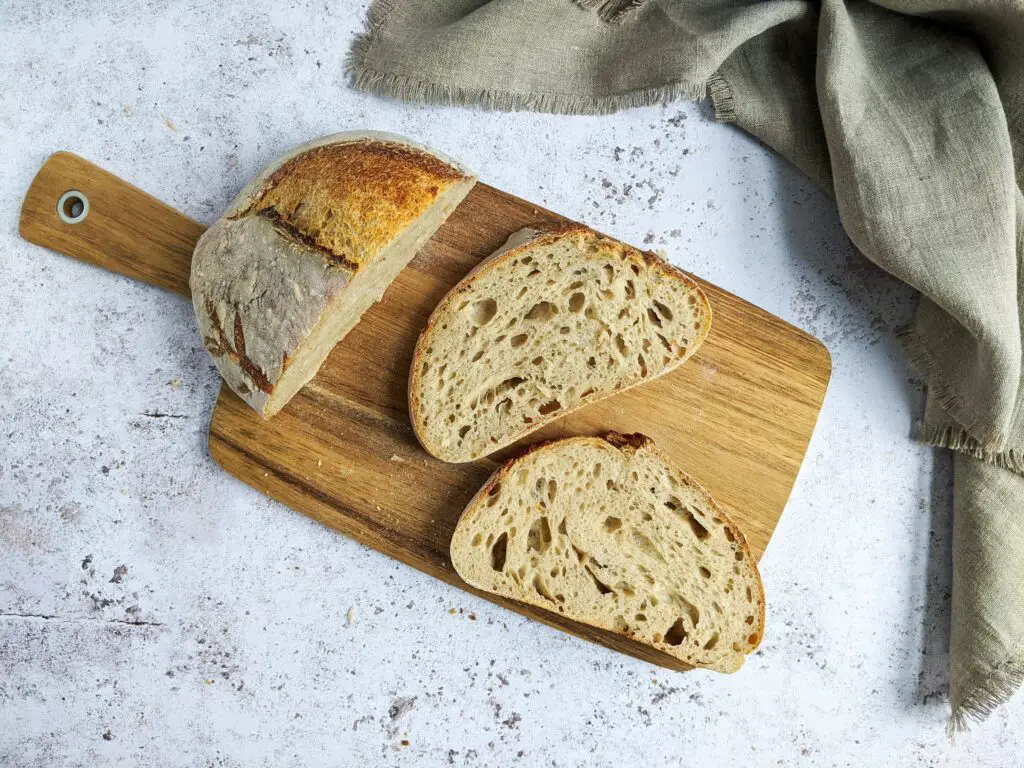
There’s something magical about sourdough. No packets of yeast, no shortcuts—just flour, water, salt, and time.
It’s tangy, chewy, crusty perfection that feels like a tiny victory with every loaf.
Learning to bake sourdough might seem intimidating, but it’s not rocket science. It’s more like babysitting dough with benefits.
This guide will walk you through the whole process—start to finish—so you can bake your first sourdough loaf with confidence (and maybe brag a little).
What is Sourdough Bread?
Sourdough bread is made using natural fermentation instead of commercial yeast.
That means instead of tossing in a packet of store-bought yeast, you rely on a wild colony of yeast and bacteria that live in a mixture of flour and water—aka your starter.
This slow fermentation process gives sourdough its signature tangy flavor, chewy interior, and that deeply satisfying, golden-brown crust with a crackle you can hear across the kitchen.
It’s not just about taste—it’s also easier to digest for some people, thanks to the way the wild bacteria break down gluten and phytic acid over time.
Sourdough has a serious history behind it, too. Ancient Egyptians were making it over 5,000 years ago—by accident, probably—when flour and water left out in the sun started bubbling.
Prospectors in the California gold rush even carried sourdough starters with them, earning them the nickname “sourdoughs.”
So when you bake a loaf, you’re not just making bread—you’re continuing a tradition older than sliced bread itself.
Benefits of Baking Sourdough
No Need for Store-Bought Yeast
One of the coolest things about sourdough is that you don’t need to buy yeast, ever.
Your sourdough starter acts as a natural leavening agent, full of wild yeast and good bacteria from your environment.
Once your starter is established, it becomes a living ingredient you can feed, reuse, and share.
No more emergency runs to the store because you’re out of those little packets. It’s self-sufficient bread magic.
Easier to Digest
Sourdough is often gentler on the stomach compared to regular bread. That’s thanks to the lactic acid bacteria that work during fermentation.
These little guys break down gluten and phytic acid—two things that can make digestion tricky for some people.
The result? A bread that’s not only tasty but also easier for many folks to tolerate, especially those with mild gluten sensitivity (though not celiac).
Longer Shelf Life
Unlike fluffy white loaves that go stale in a day or two, sourdough stays fresh much longer. The acidity from the fermentation naturally helps prevent mold and slows down staling.
This means your homemade loaf can last several days on the counter without turning into a brick. Less waste, more toast.
Great Weekend Project & Mindful Hobby
Sourdough is hands-on, slow, and oddly calming. It’s not just about feeding your stomach—it feeds your soul a little, too. Stretching and folding dough becomes a rhythmic routine.
Watching your starter bubble feels like watching a tiny science project come to life. It teaches patience, presence, and the joy of small wins.
And let’s be honest—few things beat slicing into your first successful loaf and hearing that crust crackle. It’s therapy… with carbs.
Tools and Ingredients You’ll Need
Before you dive into your first sourdough loaf, it helps to have the right gear on hand. You don’t need a professional bakery setup—just a few key tools and simple ingredients.
Below are the essentials with specific suggestions to make your baking smoother and more consistent.
🧰 Basic Tools
- 2–3 Mixing Bowls (medium to large): For mixing dough, resting, and bulk fermentation
- Kitchen Scale: Essential. Accuracy matters in sourdough—skip the measuring cups
- Dutch Oven (5–6 qt): Helps trap steam for a crisp crust and good oven spring
- Alternative: Pizza stone with a deep roasting pan or stainless-steel bowl as a lid
- Bench/Dough Scraper: Makes handling and shaping dough way easier
- Banneton Basket (optional): Great for proofing and shaping your loaf
- Tip: A bowl lined with a floured towel works in a pinch
🥖 Core Ingredients
- Flour:
- 400g Bread Flour – High protein content gives better structure
- Optional: Replace up to 100g with Whole Wheat or Rye for flavor/depth
- Water:
- 300g (75% hydration) – Filtered or dechlorinated is best
- Adjust based on flour type and humidity
- Salt:
- 8g (about 2% of flour weight) – Sea salt or kosher salt preferred
- Active Sourdough Starter:
- 100g (fed 4–6 hours before mixing) – Should be bubbly, doubled, and pass the float test
Understanding the Sourdough Starter
What It Is and Why It Matters
A sourdough starter is a living mixture of flour, water, wild yeast, and lactic acid bacteria. Think of it as the heart and soul of your sourdough bread.
It’s what gives the loaf its rise, its signature tang, and its deep flavor. Unlike commercial yeast, which gives instant lift, a starter works slowly—but brings way more character to the party.
If your starter isn’t happy or active, your bread won’t rise properly. So yeah… it matters—a lot.
How to Get One (Buy, Borrow, or Grow Your Own)
You’ve got options. Easiest route? Borrow a spoonful from a sourdough-loving friend—most are happy to share (weird flex, but sourdough people are generous like that).
Don’t know anyone baking? You can also buy dehydrated starters online or at specialty stores.
But if you’re up for a fun science experiment, you can grow your own from scratch using just flour, water, and patience.
Spoiler: it’s way more satisfying to say, “Yeah, I raised that from day one.”
Simple Step-by-Step to Make Your Own Starter (5–7 Days)
Day 1:
- Mix 60g whole wheat flour with 60g water in a jar.
- Stir well, cover loosely, and let it sit at room temp (ideally 70–75°F).
Day 2:
- You might see some bubbles—great!
- Discard half and feed with 60g flour + 60g water (can be all-purpose or a mix).
Days 3–4:
- Bubbles should increase. Smell might turn sour or fruity.
- Keep discarding half and feeding daily with the same 1:1:1 ratio (starter:flour:water).
Days 5–6:
- Starter should rise and fall predictably. Bubbly, airy, and smelling slightly tangy? You’re close.
- Test it: drop a spoonful in water—if it floats, it’s ready to bake.
Day 7+:
- If it’s not floating yet, keep feeding daily. Some starters take longer to mature depending on room temp and flour type. Be patient. It’s a relationship, not a race.
Feeding and Maintaining Your Starter
Once active, your starter needs regular feedings—kind of like a sour little pet. If you bake daily, feed it every day, and leave it at room temp.
If you bake once a week, store it in the fridge and feed it once a week. Each time: discard half, then add equal parts flour and water (by weight).
Keep the jar clean, scrape down the sides, and label it with the feeding date.
If it ever smells like nail polish remover or gets liquid on top (called “hooch”), it’s just hungry—give it a good feed and it’ll bounce back.
Treat it well, and your starter will last forever. Seriously—some bakeries are using century-old starters. Yours could outlive your houseplants.
Basic Sourdough Baking Timeline (Simplified for Beginners)
Night Before: Feed Your Starter
This is where the magic begins. The night before you plan to bake, feed your sourdough starter so it’s bubbly and active by morning.
If it’s been living in the fridge, pull it out and give it a solid meal—discard half, then feed it equal parts flour and water by weight (for example, 50g each).
Leave it at room temperature overnight. You want it to double in size and pass the “float test” by the next morning (drop a spoonful in water—if it floats, it’s ready).
Morning: Mix the Dough (Autolyse, Add Salt)
In the morning, start by mixing your flour and water—but not the salt yet.
This is called the autolyse stage, and it gives the flour time to fully absorb the water and develop gluten naturally. Let it rest for 30–60 minutes.
After that, add your starter and salt, and mix everything together by hand until it forms a sticky, shaggy dough. Don’t worry—it’s supposed to look messy. Cover it up and let it rest again.
Midday: Stretch and Folds
Now comes the fun part—no kneading, just some gentle stretch-and-folds. Every 30–45 minutes for the next few hours, reach under the dough, stretch it up, and fold it over itself.
Do this in all four directions. This builds structure while keeping the dough airy and light. You’ll usually do this 3 to 4 times during the bulk fermentation phase.
Each round takes under a minute. Between folds, just let the dough rest, covered at room temperature. By the end of this stage, it should feel smoother and puffier.
Evening: Shape and Rest
Once the dough has risen noticeably (it should look airy and jiggly), it’s time to shape it. Gently turn it out onto a floured surface.
Pre-shape it into a loose round, let it rest 20–30 minutes, then do your final shaping. Place it seam-side up in a floured banneton or bowl lined with a towel.
Cover it with a bag or cloth to keep it from drying out, and let it rest on the counter for about 30–60 minutes while you wind down for the evening.
Overnight: Cold Proof in the Fridge
After its short bench rest, the dough goes into the fridge overnight. This is the cold proof, and it does two things: slows fermentation and deepens the flavor.
It also makes the dough easier to score and handle the next day. Pop it in the fridge (still in the bowl or banneton) covered tightly. No need to touch it again until morning.
Next Day: Bake!
Preheat your oven to 450°F (230°C) with your Dutch oven inside—this step is crucial.
Once the oven is hot, gently flip your dough onto a piece of parchment paper. Score the top with a sharp blade to help it expand, then transfer it into the Dutch oven.
Bake with the lid on for 20 minutes to trap steam, then remove the lid and bake for another 20–25 minutes until it’s deeply golden and sounds hollow when tapped.
Let it cool completely before slicing (we know it’s hard, but the steam inside needs time to settle). And just like that—you’ve made sourdough!
Step-by-Step: Beginner-Friendly Sourdough Recipe
Activate Starter
Start by making sure your sourdough starter is wide awake and ready to go. Feed it about 4–6 hours before mixing your dough—ideally in the morning if you plan to bake the next day.
It should double in size, look bubbly, and pass the float test (a spoonful should float in water). If it sinks like a rock, give it more time or another feeding. A lazy starter equals flat bread.
Mix Ingredients
In a large bowl, combine:
- 400g bread flour
- 100g active starter
- 300g room temperature water (filtered if possible)
Stir everything together until no dry flour remains. It’ll look messy and shaggy, like a sticky blob. That’s okay—you’re not going for smooth at this point. Cover the bowl and let it sit.
Autolyse and Rest
Let the mixed dough rest for 30–60 minutes. This is the autolyse stage where the flour fully absorbs the water and starts to relax.
It makes your dough easier to handle and builds natural gluten. No need to poke it—just let it be. This little nap does a lot.
Add Salt
Now sprinkle in 8g salt (about 1½ tsp). Gently press it into the dough and use your hands to fold and squish it in. You can also add a tiny splash of water (10–15g) to help it dissolve.
Don’t worry if it’s not perfectly smooth—it’ll all come together during the folds.
Stretch and Fold Technique
Over the next 3–4 hours, perform a series of stretch-and-folds. Every 30–45 minutes, wet your hand, reach under one side of the dough, stretch it up gently, and fold it over itself.
Rotate the bowl and repeat on all four sides. This replaces kneading and helps build strength without deflating the dough.
Each session only takes a minute, then cover and let it rest again.
Bulk Fermentation
After the final fold, cover the dough and let it ferment at room temp for a few more hours—this is called bulk fermentation.
You’re done when the dough looks puffier, has visible bubbles, and jiggles slightly when moved.
It won’t double like store-bought yeast dough, but it should feel alive and airy. Depending on the temperature, this whole process can take 4–6 hours.
Pre-shape and Bench Rest
Gently tip the dough onto a lightly floured surface. Use your dough scraper to tuck it into a loose round shape. Let it rest uncovered for 20–30 minutes.
This makes final shaping easier and gives the gluten a short break. It also helps the dough hold its shape better later.
Final Shape and Cold Proof
After the bench rest, do your final shaping.
Fold the dough like an envelope—bottom up, sides in, top down—then flip it seam-side down and tighten it slightly by dragging it toward you on the counter.
Place it in a floured banneton or bowl lined with a well-floured towel, seam side up. Cover and refrigerate overnight.
This slow, cold proof develops flavor and makes the dough easier to handle when baking.
Bake in Dutch Oven
The next day, preheat your oven to 450°F (230°C) with your Dutch oven inside. After 30–45 minutes, gently flip your dough onto parchment paper.
Score the top with a sharp blade—this controls how it expands in the oven. Carefully transfer it into the hot Dutch oven, lid on.
Bake for 20 minutes with the lid, then remove the lid and bake another 20–25 minutes until deep golden brown.
If the bottom needs more color, remove the loaf from the pot and bake directly on the oven rack for an extra 5 minutes.
Cool Before Slicing
This is the hardest part—wait at least 1–2 hours before slicing. Yes, really. Cutting too early traps steam and ruins the texture.
Let it cool completely so the crumb sets properly. Once cool, slice it up, slather on some butter, and take a proud bite.
You made sourdough from scratch—like a total bread boss.
Common Mistakes Beginners Make
Under/Over-Proofing
Proofing is where most beginner sourdoughs go sideways. Under-proofed dough hasn’t fermented enough—it’ll be tight, dense, and might burst weirdly in the oven.
Over-proofed dough, on the other hand, collapses like a sad balloon. It gets too airy and weak to hold its shape. The trick is learning to read the dough, not the clock.
Look for signs: a jiggly surface, visible bubbles, and a slight rise. If it springs back slowly when poked, it’s probably ready. Don’t stress—it takes practice.
Trust your eyes and hands more than the timer.
Not Using a Scale
Eyeballing ingredients is great for soup, not for sourdough. Measuring by volume (cups and tablespoons) is wildly inconsistent, especially with flour.
Too much, and your dough’s a dry brick. Too little, and it’s soup. Use a digital kitchen scale. It removes the guesswork and gives you repeatable results.
400 grams of flour is always 400 grams—no matter how fluffy or packed it is in your measuring cup. If you want consistent loaves, this one tool makes a massive difference.
Cutting Too Soon After Baking
Fresh out of the oven, your sourdough will smell like heaven. Your instinct? Slice into it immediately. But wait. Cutting too soon lets steam escape and messes up the crumb.
You’ll end up with gummy, sticky slices that aren’t fully set. Let it cool for at least one hour (two is better) before slicing. If it’s still warm inside, it’s not ready.
Think of it like resting steak—it makes all the difference. Pour a cup of tea, admire your crust, and give it time to settle.
Ignoring Dough Temperature
Temperature is everything in sourdough baking. A warm kitchen speeds up fermentation, while a cold one slows things down.
If your dough is sluggish and not rising, check your room temp—or the water you used. Aim for dough temp around 75–78°F (24–26°C).
Using a thermometer to check your dough isn’t overkill—it’s smart. Too hot, and the dough ferments too fast and collapses.
Too cold, and it just sits there like a lump. Stay in the Goldilocks zone, and your bread will thank you.
Tips for Success
Patience Is Everything
Sourdough doesn’t care about your schedule. It rises when it’s ready—not when you’re ready. If you try to rush it, the dough will fight back with dense slices and uneven crumbs.
So slow down. Let the starter mature. Let the dough rise at its own pace. Think of it as baking in real time, not fast-forward.
The more you lean into the wait, the better your bread will turn out. Good sourdough isn’t made in a hurry—it’s made with time, love, and a little flour on your shirt.
Use a Kitchen Thermometer
If you’re serious about consistency, grab a digital thermometer. It’s your secret weapon.
Use it to check water temperature when mixing dough (aim for 75–80°F) and dough temp during fermentation.
Room too cold? Fermentation crawls. Dough too warm? It races and flattens. A thermometer keeps things predictable, especially in different seasons.
Bonus: you can also use it to check if your loaf is baked through (should hit about 208–212°F inside). No more guessing, no more gummy centers.
Keep Notes (Hydration %, Timings, Temps)
Treat each bake like a mini experiment. Write down how much water you used (hydration percentage), how long each stage took, and how warm your kitchen was.
Did you proof for 4 hours or 6? Did you use 300g or 325g of water? These little details matter.
They’ll help you troubleshoot when things go sideways and replicate success when you hit gold.
Use a notebook, app, or even sticky notes on your fridge. Over time, you’ll build your own sourdough cheat sheet.
Practice Makes Better — Each Bake Teaches Something
Don’t aim for perfection. Aim for progress. Your first loaf might be flat. Your second might be too sour. That’s okay.
Every bake teaches you something new—how the dough feels, how your oven behaves, what “ready” looks like. Sourdough is less about nailing a recipe and more about learning a rhythm.
It’s a dance between science and feel. The more you bake, the better you get. So keep going. Your “meh” loaf today is just a warm-up for the showstopper you’ll bake next week.
Optional Add-Ons & Variations
Add-ins: Herbs, Cheese, Olives, Cranberries
Once you’ve nailed the basics, it’s time to have a little fun. Add-ins can turn a simple loaf into something unforgettable.
Want something savory? Try mixing in chopped rosemary, thyme, roasted garlic, or shredded cheddar during your final stretch and fold.
Feeling fancy? Toss in pitted olives, sun-dried tomatoes, or caramelized onions. Craving sweet? Go for dried cranberries, raisins, chopped nuts, or cinnamon.
Just keep the total add-ins to around 15–20% of the dough weight so they don’t overpower the structure.
Fold them in gently so they’re spread evenly—no one wants all the olives in one slice.
Whole Wheat or Rye Blends
Switching up your flour is a great way to experiment with flavor and nutrition. Adding whole wheat flour gives your loaf a nutty taste and boosts fiber.
Adding rye brings earthy complexity and makes your starter extra happy (rye ferments like a rocket). Try swapping out 20–30% of your bread flour with whole wheat or rye to start.
Just know these flours absorb more water and ferment faster, so you might need to tweak your hydration or shorten your proofing time. Test and taste. You’ll find your favorite combo.
Scoring Designs (for Aesthetics and Control)
Scoring isn’t just for looks—it’s a tool to control how your loaf expands in the oven. A deep score lets steam escape and helps the bread open up instead of tearing unpredictably.
The most basic score is a single slash across the top, but once you’re comfortable, try more decorative patterns. You can make leaves, stars, or even wheat stalks if you’re feeling artsy.
Use a sharp razor or bread lame, and don’t overthink it. Even a wobbly score still bakes beautifully.
Remember, every loaf is unique—and that imperfect design just means it’s homemade.
Final Words
Baking sourdough is part science, part art, and a whole lot of patience. But once you slice into that first crackly crust and see the airy crumb inside, it’s all worth it.
Every loaf is a small win—and a delicious one at that.
Don’t be afraid to tweak, fail, and try again. That’s how great bakers are made.
Tried it? Tag us in your first sourdough loaf—we’d love to cheer you on!
FAQs
How do I know when my starter is ready?
A ready starter should double in size within 4–6 hours of feeding, look bubbly, and pass the float test—drop a spoonful in water, and if it floats, it’s good to go.
If it sinks, it either needs more time or another feeding. Smell also matters—it should be pleasantly tangy, not sour in a bad way.
Can I freeze my starter?
Yes! If you’re taking a sourdough break, you can freeze your starter. Just feed it, let it rise, then scoop it into an airtight container and freeze.
When you’re ready to revive it, thaw it in the fridge and start feeding it again for a couple of days until it’s active.
What’s the best flour for sourdough?
Bread flour is a solid go-to—it has higher protein, which gives your loaf better structure. You can also blend in whole wheat or rye for flavor and fermentation power.
Avoid bleached flour or anything super refined—it lacks the nutrients wild yeast and bacteria love.
Why didn’t my bread rise much?
Flat loaf? A few culprits: your starter wasn’t active enough, the dough was under- or over-proofed, or the room was too cold. Check your fermentation times and dough temperature.
And don’t skip the stretch-and-folds—they build strength. Also, a dull blade or poor scoring can trap steam and prevent oven spring.
Can I bake without a Dutch oven?
Absolutely. While a Dutch oven gives that epic crust and rise, you can still get great results.
Use a pizza stone or baking sheet and cover your loaf with an inverted metal bowl or roasting pan during the first part of baking to trap steam. Not as fancy, but it works like a charm.