There’s something magical about pulling a tray of fresh croissants from your own oven. Golden, flaky, buttery perfection—without stepping foot in a bakery.
Yes, they take time. But they’re absolutely worth it. Every fold, every chill, every buttery layer adds up to something you’ll be proud of.
This guide breaks it all down, step by step. No fancy chef skills needed. Just some patience, a little elbow grease, and a love for flaky carbs.
Ready to learn the secret to crisp layers and soft, airy centers? Let’s get rolling.
Tools & Ingredients You’ll Need
Essential Tools:
- Rolling pin
- Bench scraper
- Kitchen scale (for accuracy – highly recommended)
- Pastry brush
- Ruler (optional, but great for precision)
- Baking sheet lined with parchment paper
- Plastic wrap or clean kitchen towels (for proofing)
- Sharp knife or pizza cutter (for cutting dough)
Ingredients:
For the Dough (Détrempe):
- 4 cups (500g) all-purpose flour
- 1 tablespoon (10g) granulated sugar
- 2 teaspoons (8g) salt
- 1 tablespoon (10g) instant or active dry yeast
- 1¼ cups (300ml) warm milk (around 100°F / 38°C)
For the Butter Block (Beurrage):
- 1 cup (225g) unsalted butter, cold but pliable
For Egg Wash:
- 1 large egg
- 1 tablespoon (15ml) milk or water
What Makes a Croissant “Perfect”?
Flaky, Distinct Layers
The holy grail of any croissant is the layers. You don’t want a bread roll; you want pastry that peels apart like the pages of a well-loved book.
When you bite in, it should crackle slightly and reveal thin, buttery folds inside. These layers come from careful lamination—rolling and folding the dough with butter between each turn.
Get that right, and your croissants will flake like a dream.
Rich Buttery Flavor
Croissants are basically a love letter to butter. Not just any butter, though—cold, unsalted, and ideally European-style with a higher fat content.
This is where that signature richness comes from. You should be able to taste the butter in every bite without it feeling greasy. It’s a flavor that whispers luxury, not shouts “oil slick.”
Lightly Crisp Outside, Airy Inside
A perfect croissant has contrast. The outside should be golden and crisp, with just the right amount of crunch when you tear it open.
But the inside? It should feel like a pillow. Airy, soft, and full of tiny pockets of space. No doughy centers. No gumminess.
Think of it like biting into a buttery cloud wrapped in a flaky shell.
Even Golden-Brown Color
Color tells a story. Pale croissants often mean they’re underbaked or lacked egg wash. Too dark? The oven might’ve been too hot, or they were left in too long.
A beautiful croissant should be evenly golden all over, with slightly deeper tones at the tips and folds. That’s your visual cue that it’s baked to perfection.
Light Chew, Never Dense
When you chew a croissant, it should feel delicate. There’s a soft bounce to the layers, not a doughy drag.
If it feels heavy or bready, something went wrong—likely under-proofing or using too much flour during lamination.
The texture should be light, airy, and just chewy enough to hold its shape without collapsing.
Absolutely! Here’s the detailed and conversational content for:
Step 1: Make the Dough (Détrempe)
Activate the Yeast
Start by warming up your milk—it should be just warm to the touch, not hot. Around 100°F (38°C) is perfect. Pour 1¼ cups (300ml) of warm milk into a large bowl.
Add 1 tablespoon of sugar and 1 tablespoon of instant (or active dry) yeast.
Give it a quick stir, then let it sit for about 5–10 minutes. You’re looking for bubbles and foam—this means the yeast is awake and ready to work.
Tip: If nothing happens after 10 minutes, your yeast might be dead. Toss it and try again with fresh yeast.
Mix the Dough
Once the yeast mixture is nice and foamy, add in 4 cups (500g) of all-purpose flour and 2 teaspoons of salt. Stir everything together until a shaggy dough forms.
If it’s too sticky, add just a tablespoon of flour at a time. No need to knead like you’re prepping pizza dough—we’re keeping things gentle here.
Quick Knead and Shape
Turn the dough out onto a floured surface. Knead it by hand for about 2–3 minutes. You’re not building muscle here—just smoothing things out.
Once it’s soft and even, shape it into a flat square, about 1 inch thick. Wrap it in plastic wrap and pop it in the fridge for 30 to 60 minutes.
This gives the gluten time to relax and firms up the dough for the butter block coming next.
Step 2: Prepare the Butter Block (Beurrage)
Shape the Butter
Take 1 cup (225g) of cold unsalted butter and place it between two sheets of parchment paper. Using a rolling pin, bash and roll it into a flat square—about 6×6 inches (15×15 cm).
Yes, you’re allowed to take out some frustration here. Even chunks are fine at first, but aim to end with a smooth, solid, even slab.
Chill (But Not Too Much)
Here’s the tricky part: the butter needs to be cold but pliable. Think clay—not a brick of ice. If it’s too soft, it’ll ooze out later. Too hard? It’ll shatter when rolled.
If you’ve got it at the right texture, wrap it up and stick it in the fridge while your dough finishes chilling.
Pro tip: If both the dough and butter are at similar firmness, lamination will be a breeze. Don’t skip this balance check!
Step 3: Encase the Butter
Roll Out the Dough
Once the dough is chilled and firm, lightly flour your surface. Roll it out into a square about 10×10 inches (25×25 cm). Try to keep the edges even.
Dust off excess flour with a pastry brush if needed.
Place the Butter in the Center
Take your butter block out of the fridge. Unwrap it and place it diagonally in the center of the dough, so it looks like a diamond inside a square.
The corners of the butter should point toward the straight edges of the dough.
Fold Like an Envelope
Fold each corner of the dough over the butter, one at a time, until it’s completely enclosed—like you’re wrapping a present or sealing a big envelope.
Pinch the seams closed gently so no butter escapes during rolling.
Reminder: Butter leakage is the enemy of flaky layers. Seal it like you mean it.
Step 4: Laminate the Dough (Folds & Turns)
First Fold: The Foundation of Flakiness
Take your dough-wrapped butter block out of the fridge and place it on a lightly floured surface. Roll it into a long rectangle—aim for about 8×24 inches (20×60 cm).
Go slow and steady. If the butter starts to resist or peek through, stop and chill again.
Once rolled, it’s time for the letter fold. Imagine folding a letter into an envelope: fold the top third of the dough down, then the bottom third up over it.
That’s one complete turn. You should now have a neat rectangle with three layers.
Wrap the dough in plastic wrap and refrigerate for 30–45 minutes. This helps the gluten relax and keeps the butter from melting into the dough. Cold dough = clean layers.
Second & Third Folds: Build the Layers
Once the dough is firm again, repeat the process. Roll it back out into the same long rectangle. Do another letter fold. That’s fold number two.
Chill again for 30–45 minutes. Seriously, don’t skip the chilling. Warm dough will smear the butter and ruin the layers.
Now, do the third and final fold. Same steps: roll, fold, and chill. By now, your dough has built up 27 layers of buttery goodness. That’s where the magic happens when they hit the oven.
Note: If at any point the dough feels too soft, butter leaks, or rolling feels sticky—pause. Pop it back in the fridge for 10–15 minutes. Patience is key here.
Step 5: Shape the Croissants
Roll It Out
After your final chill, place the dough on a floured surface. Roll it into a large rectangle, about 9×18 inches (23×46 cm) and roughly ¼ inch (6mm) thick.
Try to keep the shape even for consistent croissants.
Trim and Cut
Use a ruler and sharp knife or pizza cutter to trim the edges—clean edges help with better layering.
Then cut the dough into long triangles, each with a 3–4 inch (7–10 cm) base. You should get about 12–14 pieces.
Shape Like a Pro
Take one triangle. Gently stretch it a bit lengthwise. Starting from the wide end, roll it up toward the point. Don’t press too hard—keep it loose but snug.
Once rolled, bend the ends slightly inward to form the classic crescent shape.
Place each croissant on a parchment-lined baking sheet, tip side down, to stop them from unrolling.
Step 6: Final Proof
Let Them Rise
Cover your shaped croissants loosely with plastic wrap or a clean kitchen towel. Let them rise at room temperature for 1½ to 2 hours.
You’re looking for puffy, jiggly croissants—not doubled in size, just pleasantly swollen.
Cold proof option: Want even better flavor and flexibility? Cover and refrigerate them overnight, then bake straight from the fridge the next morning.
Whatever method you choose, do a gentle poke test. If the dough springs back slowly, they’re ready for the oven.
Step 7: Bake to Perfection
Preheat and Prep
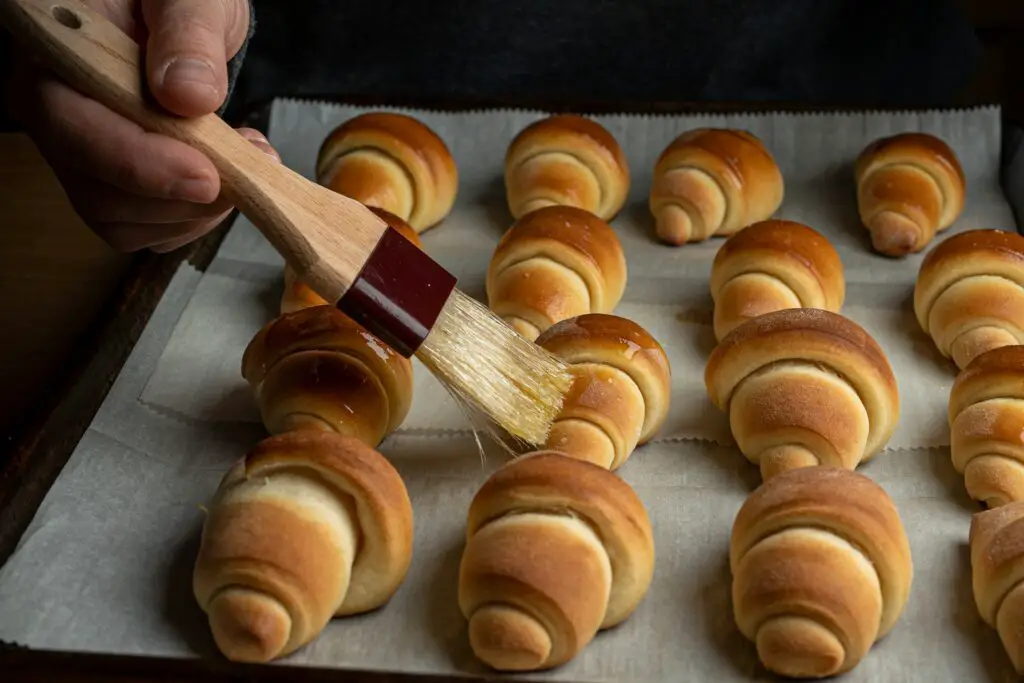
Preheat your oven to 400°F (200°C). Give your croissants a gentle brush with egg wash (1 egg + 1 tbsp milk or water). This gives that shiny, golden finish.
Be careful not to let it drip into the layers—it can seal them shut.
Bake and Enjoy
Bake for 18–22 minutes or until deeply golden brown. Rotate the tray halfway through for even baking. Don’t panic if they puff like balloons—that’s a good sign.
Let them cool for at least 10–15 minutes before diving in. The steam inside needs to settle. Then? Tear one open, admire the layers, and enjoy every buttery bite.
Bonus points if you eat one while standing barefoot in the kitchen, pretending you’re in Paris!
Optional Variations
Croissants are already magical, but once you’ve nailed the classic, it’s time to level up. Here are three delicious twists to try when you’re ready to branch out.
These variations use the exact same dough—you’re just changing what you put inside (or on top).
Pain au Chocolat (Chocolate Croissants)
Let’s be honest—these are the reason most of us started baking croissants in the first place. Pain au chocolat is just a fancy name for a chocolate-filled croissant. The process is slightly different, but super easy.
Instead of cutting triangles, slice your dough into rectangles—about 3×5 inches (7.5×12 cm). Place a chocolate baton (or a few small chunks of good-quality dark chocolate) near one short edge.
Roll the dough tightly over the chocolate, then keep rolling until it’s sealed. Place seam-side down on the baking tray.
Tip: Don’t use chocolate chips—they’ll melt and disappear. Use chocolate baking sticks or a chopped dark chocolate bar that holds its shape.
Almond Croissants
Day-old croissants get a second life as almond croissants in French bakeries—but you can make them fresh from the start.
Before rolling your triangles into crescents, spread a spoonful of almond filling on each one.
You can make almond filling by mixing:
- ½ cup (100g) almond flour
- ½ cup (100g) sugar
- 1 egg
- A splash of almond extract (optional)
Spread it on the triangle, roll as usual, and once they’re proofed and egg-washed, sprinkle sliced almonds over the top.
After baking, dust with powdered sugar. They’re nutty, buttery, and perfect with coffee.
Optional upgrade: Bake plain croissants, then slice them open the next day, fill with almond paste, brush with syrup, and rebake. That’s how the pros do it.
Savory Croissants
Who says croissants have to be sweet? This dough works beautifully with savory fillings too. Try adding a bit of shredded cheese and thin-sliced ham before rolling.
Or go gourmet with pesto and mozzarella. Just don’t overfill—it can cause leaking during baking.
Spread a small amount of filling toward the base of the triangle before you roll. Avoid going all the way to the edges so it doesn’t ooze out.
Roll gently, shape as usual, and bake the same way.
Flavor ideas:
- Sharp cheddar + thin apple slices
- Sun-dried tomato pesto + goat cheese
- Cream cheese + chopped chives
These savory croissants make perfect brunch bites, road trip snacks, or fancy lunchbox surprises.
Troubleshooting & Pro Tips
Even with the best intentions, croissants can be a bit… temperamental. But don’t worry—every hiccup is just part of the learning curve.
Here’s how to troubleshoot the usual suspects and make your next batch even better.
Butter Leaking?
If you see melted butter pooling on your baking sheet, your dough likely got too warm during the folding or proofing stages.
When the butter melts before baking, it escapes the layers—and you lose both flakiness and flavor.
Fix it:
Work quickly during laminating and take chilling seriously. If the dough ever feels sticky or soft, pop it back in the fridge for 10–15 minutes. Cold dough = happy layers.
Also, don’t over-handle it. Think of it like pastry yoga—stretch gently, don’t force it.
Pro tip: If butter starts peeking through during rolling, dust lightly with flour and fold that part inward to trap it again.
Not Rising Enough?
Croissants that bake up flat or dense often have one of two culprits: tired yeast or a chilly kitchen.
If your dough isn’t rising during the proof, it’s not building the air pockets you need for those light, airy centers.
Fix it:
Always test your yeast before mixing. A quick proof in warm milk with a little sugar will show if it’s alive (foamy = good).
Also, let the dough rise somewhere cozy—around 75°F (24°C) is ideal. In winter, your oven with the light on or a sunny window works great.
Still stuck? Try the overnight cold-proof method. The long rest in the fridge gives yeast more time to do its thing.
Layers Not Distinct?
If your baked croissants look more like soft bread rolls than flaky pastries, the issue is probably in your folds—or your fridge time.
Skipped chill steps or sloppy folding can blur the layers and ruin that signature flake.
Fix it:
Be precise with your folds and always chill between each turn. Trim edges before rolling to keep the layers sharp.
And don’t press down too hard while rolling—you’re stacking butter and dough, not flattening them into a pancake.
Helpful trick: Lightly flour the dough before each fold, then brush off the excess to avoid gluey seams.
Use the Right Butter
Yes, the butter matters. A lot. Regular grocery store butter works, but for best results, go with unsalted European-style butter.
It has a higher fat content and lower water percentage, which makes for better texture and flavor.
Look for:
Brands like Kerrygold, Président, or Plugrá. They’re rich, smooth, and easier to work with during lamination.
Bonus—they make your croissants taste like they came straight out of a Paris bakery!
Final Words
Making croissants from scratch isn’t fast, but it’s absolutely worth it. Flaky, buttery, and fresh from your own oven? That’s hard to beat.
Yes, the first batch might be a little wonky. That’s okay. Every great baker started with a lopsided croissant or two.
So roll up your sleeves, trust the process, and enjoy the journey.
Tried these at home? Tag us in your flaky creations—we’d love to see!
FAQs
Can I freeze croissant dough?
Yes! After shaping the croissants (but before the final proof), place them on a baking sheet and freeze until solid. Then transfer to a freezer bag.
When ready to bake, let them thaw and proof at room temp until puffy—this can take 3–4 hours. Then bake as usual.
How long do baked croissants stay fresh?
They’re best the day they’re baked—especially within the first few hours. After that, store them in an airtight container at room temp for up to 2 days.
Reheat in a 300°F (150°C) oven for 5–7 minutes to revive that crispness.
Bonus tip: You can also freeze baked croissants. Just wrap tightly, freeze, and reheat straight from frozen.
Can I use a stand mixer?
Absolutely. Use the dough hook to mix and knead the détrempe (base dough) until smooth—about 3–4 minutes. But once butter gets involved, everything should be done by hand.
Laminating in a mixer? Nope. That’s a recipe for disaster (and butter soup).
What’s the difference between croissant dough and puff pastry?
Great question. Both are laminated doughs, but croissant dough contains yeast and a bit of sugar. Puff pastry doesn’t. Croissants rise and have a soft, airy interior.
Puff pastry is crisp and flaky all the way through. One’s a bread-pastry hybrid, the other’s full-on pastry.
Can I make it dairy-free?
It’s tricky, but possible. You’ll need a plant-based butter that behaves like real butter—cold, firm, and high in fat. Skip margarine or soft spreads; they’re too oily.
As for the milk, any unsweetened non-dairy option (like soy or oat) will work in the dough. Just know the flavor and texture won’t be exactly the same, but still delicious!