Chocolate cravings don’t wait for special occasions, and neither should you.
Picture this: a silky chocolate filling tucked into a crisp, buttery crust—no trips to the gourmet store required.
This recipe keeps it simple. Just a handful of everyday ingredients, a few basic steps, and you’ll have a dessert that looks like it came straight from a bakery window.
By the time you’re done, you’ll not only satisfy that sweet tooth but also impress anyone lucky enough to snag a slice!
Here’s a clean ingredient breakdown with amounts, easy swaps, and pantry-friendly vibes:
Ingredients Overview
- 1 ¼ cups (150g) all-purpose flour – simple, reliable base for the crust.
- 2 tbsp unsweetened cocoa powder – deepens the chocolate flavor.
- ½ cup (115g) unsalted butter, chilled – creates that crisp, buttery bite.
- ¼ cup (50g) granulated sugar – just enough sweetness.
- 1 large egg yolk – helps bind the crust.
- Pinch of salt – balances the flavors.
- 8 oz (225g) good-quality chocolate – dark, milk, or a mix, depending on your mood.
- 1 cup (240ml) heavy cream – the secret to silky smooth filling.
- 2 large eggs – gives a custard-like texture (optional if you prefer a ganache-style tart).
- 1 tsp vanilla extract – adds warmth and depth.
Ingredient Swaps
- Chocolate: swap dark for milk or semi-sweet for a lighter taste.
- Cream: Use coconut cream for a dairy-free option.
- Flour: gluten-free blends work fine if needed.
Equipment Needed
Essential Tools
- Mixing bowls – at least one medium and one large.
- Whisk – for smooth batters and fillings.
- Saucepan – to gently heat cream.
- Tart pan (9-inch, preferably with a removable bottom) – for easy release.
- Measuring cups and spoons – accuracy makes a difference.
- Knife and cutting board – to chop chocolate.
Optional Extras
- Food processor – speeds up crust prep.
- Offset spatula – makes spreading the filling silky smooth.
- Rolling pin – handy if you prefer rolling the dough instead of pressing it in.
Step-by-Step Instructions
1. Make the Tart Crust
Start with the crust, because it needs time to cool before you add the filling. In a mixing bowl, combine the flour, cocoa powder, sugar, and a pinch of salt.
These dry ingredients lay the groundwork for that chocolatey, slightly crisp base.
Cut the cold butter into small cubes and add it to the bowl. Use your fingertips or a pastry cutter to rub the butter into the flour until the mixture looks like coarse breadcrumbs.
If you prefer shortcuts, a food processor does this in seconds.
Next, mix in the egg yolk until the dough comes together. If it feels too dry, add a teaspoon of cold water. Don’t overwork it—handling it too much can make the crust tough instead of tender.
Press the dough evenly into the tart pan, making sure it creeps up the sides. Dock the base with a fork to stop it from puffing. Bake at 350°F (175°C) for about 15 minutes, or until firm.
Let it cool completely before moving on.
2. Prepare the Chocolate Filling
While the crust cools, move to the star of the show: the filling. Chop your chocolate into small pieces so it melts evenly. Place it in a heatproof bowl.
In a saucepan, gently heat the cream until it just begins to simmer. Don’t let it boil—boiled cream can split or scorch, and no one wants that.
Pour the hot cream over the chocolate and let it sit for a minute before stirring. Slowly whisk until the mixture turns smooth and glossy, like melted velvet.
For a custard-style tart, whisk in the eggs one at a time, along with the vanilla. This version bakes up slightly firmer and slices cleanly.
If you’re after a no-bake option, skip the eggs and you’ll have a rich ganache filling that chills into place. Both are delicious—it just depends on your mood.
3. Assemble and Bake
Once the crust has cooled, pour the chocolate mixture straight in. Use an offset spatula or the back of a spoon to smooth the surface.
For the baked version, return the tart to the oven at 325°F (160°C) for 15–20 minutes, or until the edges are set but the center still has a little wobble.
Think of it like a cheesecake—slightly jiggly is perfect. For the no-bake route, simply cover and chill in the fridge for at least 2 hours, or until the filling firms up.
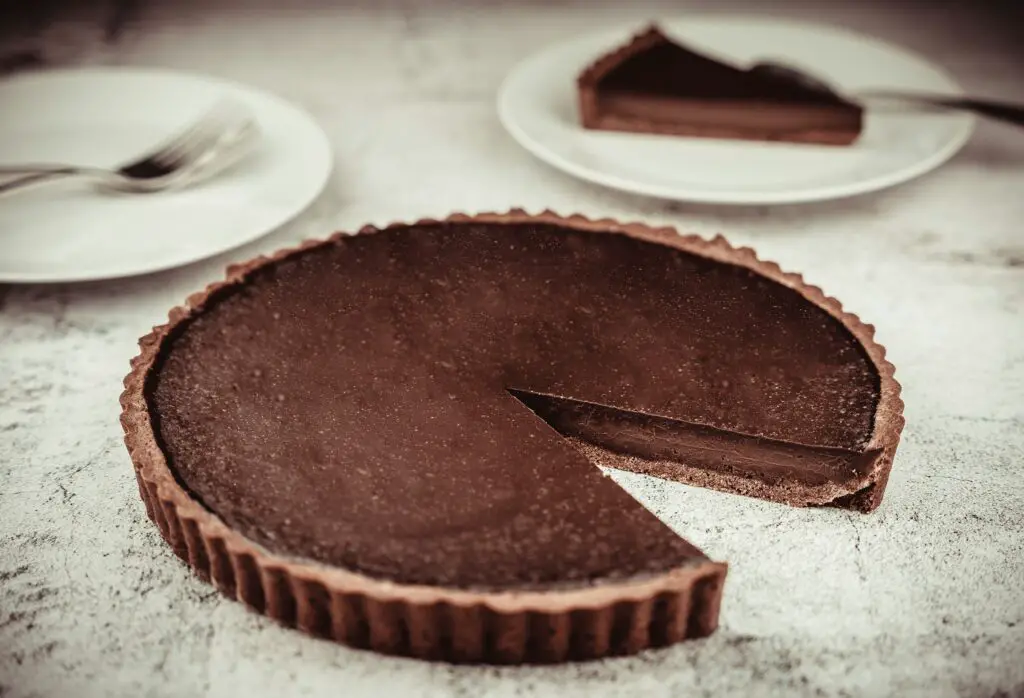
When ready, remove from the pan carefully, slice, and admire your work. You’ve officially upgraded from chocolate cravings to chocolate triumph!
Optional Toppings & Variations
A Simple Dusting
Sometimes less really is more. A quick dusting of cocoa powder or powdered sugar instantly makes your tart look polished without adding extra work.
Cocoa gives it that rich café vibe, while powdered sugar adds a touch of elegance—like snow on chocolate. Both are fuss-free but create a professional finish.
Fresh and Fruity Add-Ons
Chocolate pairs beautifully with fruit. A handful of raspberries or strawberries adds brightness that cuts through the richness. Blueberries bring a gentle sweetness, while blackberries add a subtle tart bite.
Arrange them in neat circles if you want a showstopper look, or scatter them freely for a more casual, rustic style. Either way, the berries make the tart feel fresh and balanced.
Whipped Cream and Shaved Chocolate
If you’re leaning into indulgence, whipped cream is your best friend. A dollop on each slice softens the intensity of the chocolate and makes every bite more luxurious.
For extra flair, grate or shave a bit of chocolate over the top. It’s like giving your tart a chocolate crown—fancy without being fussy.
Flavor Twists to Try
Here’s where you can play. Stir a shot of espresso into the filling for a mocha kick that wakes up the flavor. A little orange zest brings a citrusy brightness that feels refreshing and unexpected.
And don’t underestimate sea salt flakes—just a sprinkle can make the chocolate taste deeper, bolder, and more complex. Think of it as the “wow” button for your tart.
Storage & Make-Ahead Tips
This tart is as practical as it is delicious, which makes storing and prepping ahead a breeze.
Once baked or chilled, keep it in the fridge where it stays fresh for up to 3 days—just cover it loosely with plastic wrap or foil to stop it from drying out.
It’s best enjoyed slightly chilled, since that’s when the filling holds its silky texture without being too firm, though you can let it sit at room temperature for 10 minutes before serving if you like it softer.
Leftovers freeze surprisingly well too: slice the tart into individual portions, wrap each piece tightly in plastic and then foil, and tuck them in the freezer.
When a chocolate craving strikes, simply thaw a slice overnight in the fridge, and you’ll have a ready-made treat waiting without lifting a whisk.
Serving Suggestions
This tart doesn’t need much to shine, but the right pairing can turn it into an experience.
A hot cup of coffee alongside a slice balances the richness with a little bitterness, while a glass of red wine makes it feel instantly more elegant—think date night or dinner party vibes.
For extra indulgence, top each slice with a scoop of vanilla ice cream; the contrast between cold creaminess and warm, velvety chocolate is a match made in dessert heaven.
And remember, this tart is unapologetically rich, so cut smaller slices than you would with a regular pie—your guests will thank you, and they can always come back for seconds (which they will).
Final Words
A chocolate tart may look like a fancy bakery treat, but this one proves you can create luxury with simple, everyday ingredients.
The crust is crisp, the filling is silky, and the whole thing comes together without a fuss. Try it once, then have fun experimenting—swap flavors, play with toppings, and make it your own.
And when you do, don’t keep it a secret—share a slice, a photo, or at least the joy that comes with pulling off a dessert that feels like pure magic.
FAQs
Can I make this tart without eggs?
Yes. Simply skip the eggs in the filling for a no-bake ganache-style tart. It will set in the fridge and taste just as rich.
What’s the best chocolate to use?
Good-quality chocolate makes all the difference. Dark chocolate (around 60–70% cocoa) gives a bold flavor, while milk chocolate creates a sweeter, creamier result.
Can I make it gluten-free?
Absolutely. Swap the all-purpose flour in the crust with a gluten-free blend. Just make sure it’s one designed for baking so the texture holds up.
Do I need a tart pan, or can I use a pie dish?
A tart pan with a removable bottom makes serving easier, but a pie dish works in a pinch. The crust may just be a little harder to slice neatly.
How do I prevent the crust from cracking?
Don’t overbake it, and avoid pressing the dough in too firmly. If it does crack, don’t stress—once the chocolate filling goes in, no one will notice.