Cheesecake has a way of stealing the show. It’s rich, creamy, and somehow manages to please everyone at the table. One slice in and people are already asking for seconds.
But let’s be honest—baking one can feel intimidating. Cracks, soggy crusts, and that dreaded overbake have ruined more than a few dessert dreams.
The good news? With the right steps, it’s easier than you think. This guide breaks the process down so you can bake a flawless cheesecake—smooth top, perfect crust, no stress.
Gather Your Ingredients
Before you even think about turning on the oven, let’s talk ingredients. A cheesecake is only as good as what goes into it, so starting strong here saves you from a dozen headaches later.
The Essential Base
At the heart of every great cheesecake is cream cheese. You’ll need four 8-ounce blocks (about 900g) of full-fat cream cheese. Don’t skimp on quality—this is where the magic happens.
Pair that with 1 cup (200g) of granulated sugar for sweetness, and 4 large eggs to bind everything together.
To keep it creamy and luscious, add 1 cup (240g) sour cream or, if you prefer a richer touch, 1 cup (240ml) heavy cream.
Finally, 2 teaspoons of pure vanilla extract round out the flavor with a subtle warmth.
The Crust Basics
The crust is the stage your cheesecake stands on. Classic style calls for 1 ½ cups (150g) of graham cracker crumbs, mixed with 6 tablespoons (85g) melted butter and 2 tablespoons (25g) sugar.
Press this firmly into the bottom of your springform pan—no loose crumbs allowed.
Want to switch things up? Crushed Oreos, Biscoff cookies, or even ground nuts make great alternatives.
Optional Add-Ons
This is where you can let your personality shine. A teaspoon of lemon zest cuts the richness with a bright pop.
A few ounces of melted chocolate stirred into the filling make it decadent and bold.
Planning to go fruity? Have some fresh berries or cherry pie topping ready to crown your creation. These extras don’t just add flavor; they make your cheesecake memorable.
Ingredient Quality Tips
Here’s a golden rule: bring your cream cheese, eggs, and sour cream to room temperature before mixing.
Cold ingredients are stubborn and clumpy, which is how lumps sneak into your batter. Fresh eggs also make a difference—they whip up smoother and blend more evenly.
Think of it as giving your cheesecake the VIP treatment; if your ingredients are happy, your cheesecake will be too.
Step 1: Prepare the Crust
A cheesecake crust isn’t just a base—it’s the crunchy, buttery handshake that greets you before the creamy filling takes over. Get this part right, and you’re already halfway to dessert glory.
Step-by-Step: The Classic Graham Cracker Crust
Start with 1 ½ cups (150g) of graham cracker crumbs. If you don’t have pre-crushed crumbs, toss whole crackers into a food processor or go old-school: put them in a zip bag and crush with a rolling pin.
Add 2 tablespoons (25g) of sugar and 6 tablespoons (85g) of melted butter. Stir until the crumbs look like damp sand.
Pour the mixture into your springform pan and press it down firmly with the bottom of a glass or measuring cup.
No loose crumbs should be floating around—think “smooth sidewalk,” not “gravel driveway.” A tight, even crust sets the stage for the filling.
Why a Springform Pan Matters
A springform pan isn’t just fancy bakeware—it’s cheesecake insurance. The removable sides let you release the cake without flipping or prying it out, which means your crust stays intact.
If you’ve ever tried pulling a cheesecake out of a regular pan, you know it’s a one-way ticket to crumbles and tears.
Pre-Bake for Stability
Slide the crust into a 350°F (175°C) oven for 8–10 minutes. Pre-baking locks everything together, so it won’t get soggy once you add the filling.
Let it cool slightly before pouring in the batter—hot crust plus cold filling can cause cracks.
Fun Alternatives
Not feeling Graham crackers? Try an Oreo crust—just skip the sugar since the cookies are already sweet. For a nutty spin, use ground pecans or almonds mixed with butter.
And if you’re going gluten-free, crushed gluten-free cookies work just as well. Cheesecake is flexible like that—it plays well with whatever crust you throw at it.
Step 2: Make the Filling
The filling is where cheesecake earns its fame. Silky, rich, and slightly tangy—it’s the part that makes everyone close their eyes after the first bite.
But to get there, you need a little patience and a light touch.
Start with the Cream Cheese
Place four 8-ounce blocks (about 900g) of cream cheese in a large mixing bowl. Beat it on medium speed until it’s completely smooth and lump-free.
This step is non-negotiable—if you rush it, you’ll be chasing lumps the rest of the way. Think of it as paving the road before driving; a smooth start makes the whole ride easier.
Add Sugar and Eggs Slowly
Next, sprinkle in 1 cup (200g) of granulated sugar while mixing. Once it’s blended, crack in 4 large eggs, adding them one at a time.
Beat each egg just until it disappears into the batter before adding the next. This keeps the mixture creamy instead of overworked.
Dumping them all in at once? That’s like throwing marbles into pudding—messy and uneven.
Mix Gently—Don’t Overbeat
Here’s the part most people overdo. Too much mixing whips in extra air, which later expands in the oven and cracks your cheesecake.
Keep the speed low and stop as soon as everything looks smooth. Think of it like folding laundry: you want neat, not frantic.
Add Sour Cream or Heavy Cream
Stir in 1 cup (240g) of sour cream or 1 cup (240ml) of heavy cream. Sour cream adds tang and keeps the texture soft. Heavy cream makes it extra rich and luxurious.
Either way, this step gives the filling that melt-in-your-mouth finish.
Try Flavor Twists
Want to break from tradition? Melt 4 ounces (115g) of dark chocolate for a chocolate cheesecake.
Zest a whole lemon for brightness, or swirl in ½ cup (120g) pumpkin puree for a fall vibe.
Feeling adventurous? A teaspoon of matcha powder adds a modern, earthy twist. These little tweaks make your cheesecake stand out without complicating the process.
Step 3: Bake the Cheesecake
Now comes the moment of truth—the bake. This is where your smooth, creamy batter turns into a slice-worthy cheesecake.
Handle it right, and you’ll get a silky texture with no cracks. Rush it, and you might end up with a cheesecake that looks like the desert floor.
Why the Water Bath Matters
A water bath (or bain-marie if you’re feeling fancy) is your cheesecake’s best friend.
It keeps the oven moist and prevents the edges from cooking faster than the center. Without it, cheesecakes often crack like dry earth after a heatwave.
To do it safely, wrap the outside of your springform pan in two layers of heavy-duty foil. This keeps water from sneaking in.
Place the pan inside a larger roasting pan, then pour in hot water until it reaches about halfway up the sides. It’s like giving your cheesecake a warm spa day.
Oven Temperature and Rack Placement
Set your oven to 325°F (160°C)—a low, steady temperature is key. High heat is the enemy; it’ll puff up your cheesecake and then deflate like a sad balloon.
Position the rack in the middle of the oven so the heat flows evenly. That way, you avoid burnt edges and an undercooked center.
Don’t Overbake
The trickiest part of cheesecake baking is knowing when it’s done. Forget the toothpick test—it doesn’t work here. Instead, gently nudge the pan.
The edges should look set, while the center should jiggle slightly, almost like Jell-O. If it wobbles like soup, it needs more time.
If it’s stiff all over, you’ve gone too far. Remember: the cheesecake continues to set as it cools.
Hands Off the Oven Door
Tempted to peek? Don’t. Opening the oven door drops the temperature and messes with the bake. Each time you peek, you’re practically inviting cracks.
If curiosity is killing you, use the oven light and glass door—it’s cheesecake’s version of live-streaming.
Step 5: Cooling & Setting
Cheesecake isn’t like cookies that are ready to devour as soon as they leave the oven. This dessert needs patience.
Cooling and chilling are what transform it from “kind of tasty custard” into “oh wow, this is cheesecake.”
Gradual Cooling Process
When the baking time is up, resist the urge to yank the pan out immediately. Instead, turn the oven off and crack the door open about an inch.
Let the cheesecake sit inside for about an hour. This gentle cool-down helps prevent dramatic temperature changes, which are a main cause of cracks.
Think of it as easing your cheesecake out of the sauna instead of shoving it into a snowstorm.
Refrigerate for the Long Haul
Once it’s at room temperature, cover the pan loosely with foil or plastic wrap and move it to the fridge. Let it chill for at least 4–6 hours, though overnight is even better.
This step is where the filling firms up, the flavors settle, and the texture becomes dreamy and smooth. It’s not a shortcut-friendly process—skip the chill, and you’ll slice into a sloppy mess.
Proper Chilling = Perfect Texture
Cheesecake rewards patience. A fully chilled cake slices cleanly, holds its shape, and tastes richer. Every forkful feels creamy yet structured, not runny or rubbery.
In short, chilling is where your hard work pays off. It may feel like torture waiting, but the payoff is absolutely worth it.
Step 6: Toppings & Finishing Touches
Once your cheesecake is chilled and ready, the fun begins. Toppings are where you can get creative and dress it up—or keep it simple and let the creamy filling shine.
Think of it as picking the perfect outfit: sometimes a classic look works best, and sometimes you want to go bold.
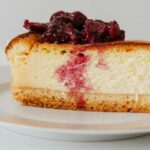
Classic Fruit Toppings
Fruit and cheesecake are a timeless duo. A glossy strawberry glaze, a spoonful of cherry pie filling, or a handful of fresh blueberries all add a bright, tangy contrast to the richness.
You can go simple with just a scatter of fresh berries, or make it extra with a homemade fruit compote. Bonus: fruit toppings hide any little cracks that might’ve snuck in.
Chocolate, Caramel, or Whipped Cream
For the sweet tooth crowd, nothing beats a drizzle of chocolate ganache or caramel sauce. Warm up a little cream and chocolate, pour it over the top, and you’ve got instant elegance.
Caramel drizzle adds a buttery sweetness that pairs perfectly with the tang of the cheesecake.
Whipped cream, piled high or piped in little swirls, adds a light and fluffy finish that balances the richness.
The Minimalist Approach
Sometimes, less really is more. Serving your cheesecake plain lets the texture and flavor take center stage. A clean slice, smooth and unadorned, shows off all your hard work.
It’s like a perfectly tailored suit—you don’t need the extra accessories to impress.
Decorative Tips for Special Occasions
If you’re serving cheesecake at a party or holiday gathering, go big on presentation.
Dust the top with cocoa powder, pipe whipped cream around the edges, or arrange sliced fruit in neat circles for a polished look.
Edible flowers or a sprinkle of gold dust can turn it into a showpiece. Cheesecake isn’t just a dessert—it can be the centerpiece of your table.
Troubleshooting Common Issues
Even with the best intentions, cheesecakes sometimes like to throw tantrums. Don’t worry—it happens to the pros, too.
The good news? Most problems have easy fixes, and some are barely noticeable once you slice and serve. Let’s break down the usual suspects.
Cracks in the Surface
Cracks are the number one complaint. They usually show up because of too much air in the batter, sudden temperature changes, or skipping the water bath.
To prevent them, mix gently, bake low and slow, and let the cake cool gradually. If a crack still shows up, don’t panic.
Cover it with fruit, ganache, or whipped cream, and no one will ever know. Think of it as cheesecake makeup—it hides everything.
Soggy Crust
A soggy crust happens when water from the bath sneaks into the pan. The culprit? Leaky foil or a thin pan.
Always double-wrap your springform pan in heavy-duty foil and keep the water level just halfway up the sides.
If you’re still worried, slide the springform pan into a larger oven-safe bag before placing it in the bath.
Prevention beats cure here, because once the crust goes soggy, there’s no bringing it back.
Signs of Overbaking
Overbaking is another cheesecake heartbreak. The edges turn dry, the center loses its creaminess, and sometimes the whole cake pulls away from the pan.
To avoid this, keep an eye on the jiggle test—the center should wobble slightly when you shake the pan.
Remember, it keeps cooking as it cools. Pull it early rather than late. It’s better to have a cheesecake that’s a little soft than one that’s dry and rubbery.
Uneven Texture
If your cheesecake looks grainy or uneven, the batter was probably overmixed or the ingredients weren’t at room temperature.
Cold cream cheese resists blending, leaving lumps behind. Overbeating, on the other hand, whips in air bubbles that bake into little craters.
The solution? Room-temp ingredients, gentle mixing, and stopping as soon as the batter is smooth. Treat it like folding a blanket—tidy but not aggressive.
Storage & Serving
Cheesecake is one of those desserts that actually gets better with a little time, so storage and serving matter just as much as baking.
Once fully cooled, it will keep in the fridge for about 5 days if covered tightly with plastic wrap or stored in an airtight container—any longer and the texture starts to suffer.
If you want to make it ahead or save leftovers, cheesecake freezes beautifully; wrap the whole cake (still in the pan for protection) in two layers of plastic wrap plus foil, or slice it into portions, wrap individually, and freeze for up to 2 months.
When you’re ready to serve, thaw it overnight in the fridge—never at room temperature, which makes it watery.
The sweet spot for serving is slightly chilled, around 45–50°F (7–10°C); too cold and it tastes firm and muted, too warm and it risks becoming mushy.
For clean, café-worthy slices, dip a sharp knife in hot water, wipe it dry, and cut—repeating between each slice.
It’s a small step that makes your cheesecake look like it was plated at a bakery rather than hacked up at home.
Final Words
Cheesecake doesn’t have to be intimidating. With the right steps, you’ll get a smooth, creamy dessert that looks and tastes like it came from a bakery.
Don’t be afraid to play with flavors and toppings—fruit, chocolate, caramel, or even something wild like matcha. Your cheesecake, your rules.
Tried this guide? Share your photos or favorite twists—I’d love to see how you made it your own.
FAQs
Can I skip the water bath?
Technically yes, but it’s risky. The water bath helps prevent cracks and keeps the texture silky. If you skip it, bake at a lower temperature and keep a close eye on the cheesecake.
What’s the best substitute if I don’t have sour cream?
Greek yogurt works well and adds the same tang. You can also use heavy cream if you want a richer, less tangy result.
Can I make cheesecake without a springform pan?
Yes, though it’s trickier. A deep pie dish or square baking dish will work, but you’ll have to serve it straight from the pan instead of lifting it out cleanly.
How do I freeze cheesecake without ruining the texture?
Cool it completely, then wrap tightly in plastic wrap and foil. Freeze whole or in slices for up to two months. Thaw overnight in the fridge before serving—never on the counter.
Can I make mini cheesecakes with this recipe?
Absolutely. Use a muffin tin lined with cupcake wrappers, and bake for about 18–20 minutes. They’re perfect for parties and portion control (at least in theory).