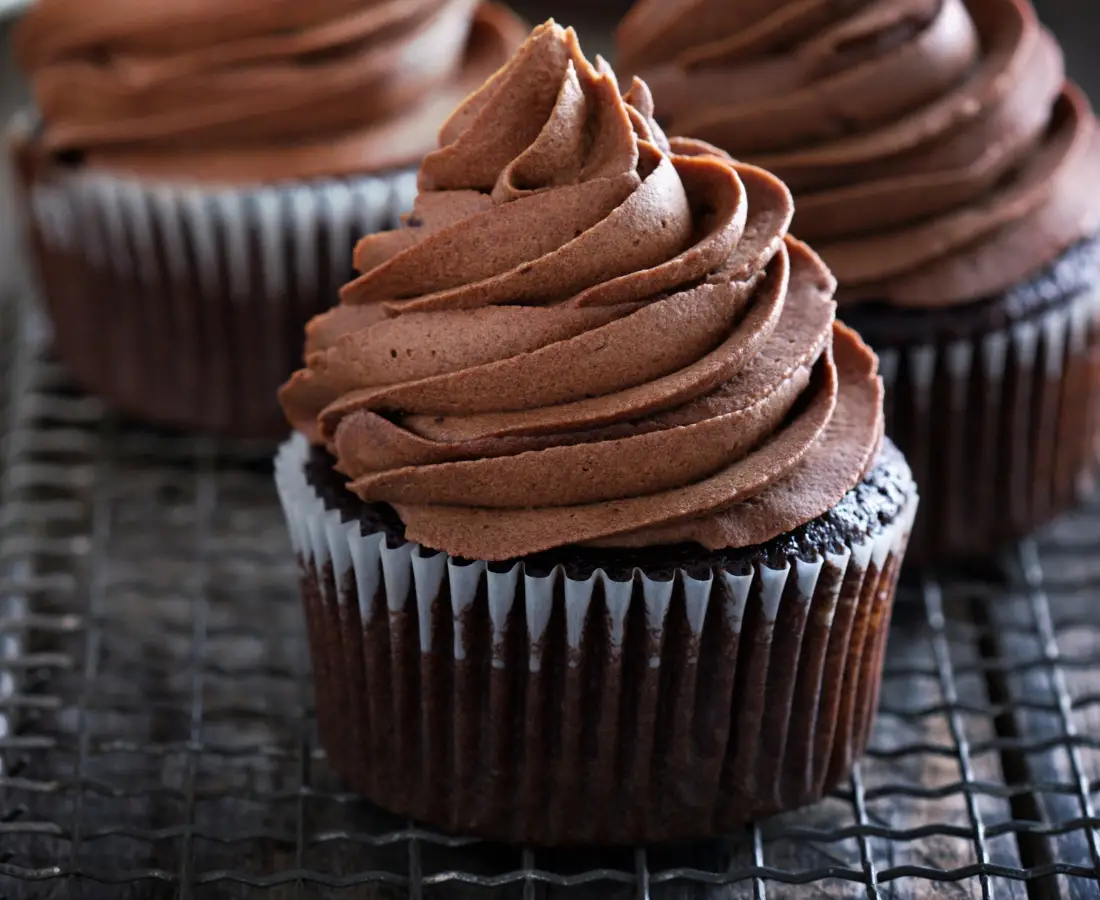
Mini chocolate cupcakes are the perfect balance of indulgence and convenience.
These bite-sized treats pack a rich, chocolaty flavor in every small bite.
Loved for their versatility, they’re ideal for parties, celebrations, or quick snacks.
Their small size makes them easy to serve and even easier to enjoy.
With this recipe, you can create moist, decadent cupcakes that everyone will love!
Why Mini Chocolate Cupcakes?
Portion Control
Mini chocolate cupcakes are the perfect size for enjoying a treat without overindulging.
Each cupcake is a small, pre-portioned dessert that makes it easy to keep track of servings.
These cupcakes provide a guilt-free option for those watching their calorie intake compared to larger desserts.
Ideal for Parties and Gatherings
Mini cupcakes are a party favorite.
Their small size makes them versatile for all types of events, from casual gatherings to formal celebrations.
Guests can grab one (or a few) without committing to a full dessert.
They’re also easy to transport, making them a great choice for potlucks, school events, or office parties.
Plus, they look stunning when displayed on dessert tables, adding charm to any occasion.
Easy to Serve and Eat
Serving and eating mini cupcakes couldn’t be simpler.
There’s no need for knives, forks, or plates—just unwrap and enjoy.
This convenience is especially useful for kids or in settings where full-sized desserts might be messy.
Their compact size also makes them easy to customize with toppings, ensuring there’s something for everyone.
Mini cupcakes bring the joy of dessert with none of the hassle.
Ingredients Overview
To make perfect mini chocolate cupcakes, you’ll need a mix of basic dry and wet ingredients.
Each one plays a key role in creating moist, flavorful cupcakes with a rich chocolate taste.
Here’s a breakdown of what you’ll need:
Dry Ingredients
- 1 cup all-purpose flour: Provides the structure for the cupcakes.
- 1/2 cup unsweetened cocoa powder: Adds a rich chocolate flavor; use natural cocoa powder.
- 3/4 teaspoon baking powder: Helps the cupcakes rise and keeps them light.
- 1/2 teaspoon baking soda: Works with the cocoa powder for proper leavening.
- 1/4 teaspoon salt: Enhances overall flavor and balances sweetness.
- 1/2 cup granulated sugar: Provides sweetness and structure.
- 1/2 cup packed light brown sugar: Adds moisture and a slight caramel note.
Wet Ingredients
- 1/3 cup vegetable oil or melted butter: Keeps the cupcakes moist and tender.
- 2 large eggs (at room temperature): Binds the ingredients and provides structure.
- 1 teaspoon vanilla extract: Enhances the flavor with a warm, sweet aroma.
- 1/2 cup buttermilk or milk: Adds moisture and creates a tender crumb.
- 1/4 cup hot water or brewed coffee: Ensures a smooth batter and intensifies the chocolate flavor.
Equipment Needed
Having the right tools on hand makes the process of baking mini chocolate cupcakes simple and efficient.
Here’s a list of the essential equipment you’ll need, along with optional tools for decorating:
Essential Equipment
- Mini Muffin Pan: A 24-cup mini muffin pan is ideal for evenly baking the cupcakes. Ensure it’s non-stick or lightly greased for easy removal.
- Mini Cupcake Liners: Prevent the cupcakes from sticking to the pan and make them easy to serve. They also add a decorative touch.
- Mixing Bowls: You’ll need at least two bowls—one for dry ingredients and one for wet ingredients.
- Whisk and Spatula: Use a whisk to combine ingredients smoothly and a spatula to scrape down the sides of the bowl.
- Measuring Cups and Spoons: Accurate measurements are key to perfect cupcakes. Use separate cups for dry and wet ingredients if possible.
Optional Equipment
- Piping Bag and Tips: For a professional look, use a piping bag fitted with your favorite tip to frost the cupcakes. Popular choices include a star or round tip for smooth or swirled designs.
Step-by-Step Recipe
Step 1: Preparation
- Preheat the Oven: Set your oven to 350°F (175°C) to ensure it’s ready when the batter is mixed.
- Prepare the Mini Muffin Pan: Line a mini muffin pan with cupcake liners. This prevents sticking and makes the cupcakes easy to remove and serve.
Step 2: Mixing the Batter
- Combine Dry Ingredients:
In a large mixing bowl, whisk together the dry ingredients:- 1 cup all-purpose flour
- 1/2 cup unsweetened cocoa powder
- 3/4 tsp baking powder
- 1/2 tsp baking soda
- 1/4 tsp salt
- 1/2 cup granulated sugar
- 1/2 cup packed light brown sugar
- Whisk Wet Ingredients:
In a separate bowl, mix the wet ingredients until smooth:- 1/3 cup vegetable oil or melted butter
- 2 large eggs
- 1 tsp vanilla extract
- 1/2 cup buttermilk or milk
- Combine Wet and Dry Ingredients: Gradually add the wet ingredients into the bowl with the dry ingredients. Stir gently until just combined; do not overmix.
- Incorporate Hot Water or Coffee: Stir in 1/4 cup hot water or brewed coffee to create a smooth, pourable batter. This step enhances the chocolate flavor and ensures the batter’s consistency.
Step 3: Filling the Liners
- Fill the Cupcake Liners: Use a small cookie scoop or spoon to fill each liner halfway to two-thirds full. This allows room for the cupcakes to rise evenly without overflowing.
Step 4: Baking
- Bake: Place the muffin pan in the preheated oven and bake for 10-12 minutes. Check for doneness by inserting a toothpick into the center of a cupcake; it should come out clean or with a few moist crumbs.
- Cool: Allow the cupcakes to cool in the pan for 2-3 minutes before transferring them to a wire rack. Let them cool completely before frosting.
Frosting Options
Frosting is the finishing touch that elevates your mini chocolate cupcakes.
Here are some options to suit different tastes and occasions, starting with a classic chocolate buttercream.
Chocolate Buttercream
Ingredients
- 1/4 cup (1/2 stick) unsalted butter, softened
- 1/2 cup powdered sugar
- 1/4 cup cocoa powder
- 1/2 teaspoon vanilla extract
- 2 tablespoons heavy cream or milk
Preparation
- In a mixing bowl, cream the butter using a hand or stand mixer until it’s smooth and fluffy.
- Gradually add the powdered sugar and cocoa powder, beating on low speed until fully incorporated.
- Mix in the vanilla extract and heavy cream. Increase the speed and whip until the frosting is smooth and spreadable.
- If the frosting is too thick, add more cream (1 teaspoon at a time). If it’s too thin, add a bit more powdered sugar.
Alternative Frostings
If you want to switch things up, here are a few other frosting options that pair beautifully with mini chocolate cupcakes:
- Cream Cheese Frosting: Slightly tangy and creamy, this frosting adds a delightful contrast to the cupcakes’ rich chocolate flavor.
- Vanilla Buttercream: A classic choice for a lighter, sweeter topping that lets the chocolate flavor shine.
- Ganache: For an ultra-decadent finish, use a smooth chocolate ganache. Made by melting chocolate with heavy cream, it creates a glossy, luxurious topping.
Decorating Ideas
Decorating mini chocolate cupcakes is where you can let your creativity shine.
The small size of these treats makes them perfect for personalized touches.
Here are some simple yet effective decorating ideas to elevate your cupcakes:
Sprinkles
Sprinkles are a timeless favorite for adding color and fun.
Choose rainbow sprinkles for a festive look or stick to a single color for a more elegant vibe.
For holidays or themed parties, opt for seasonal sprinkles like hearts for Valentine’s Day or orange and black for Halloween.
Mini Chocolate Chips
Mini chocolate chips add an extra layer of chocolaty goodness.
Sprinkle them over freshly piped frosting for added texture and visual appeal.
You can use regular mini chips or mix in white or dark chocolate varieties for contrast.
Shaved Chocolate
For a sophisticated touch, use a vegetable peeler to shave thin curls from a chocolate bar.
Scatter the shavings over the frosting to give your cupcakes a bakery-style finish.
Use milk, dark, or white chocolate based on your preference.
Themed Toppers for Special Occasions
Decorative toppers are an easy way to match cupcakes to the event.
Use pre-made picks or edible toppers shaped like stars, flowers, or characters for birthdays, weddings, or themed parties.
You can also make your own toppers using printable designs and toothpicks.
Tips for Success
Avoid Overmixing
Overmixing the batter is one of the most common mistakes when making cupcakes.
Mixing too much develops excess gluten, which can result in dense and chewy cupcakes.
To avoid this, mix the wet and dry ingredients until they are just combined.
A few small lumps in the batter are perfectly fine and will not affect the final product.
Ingredient Temperature
Using room temperature ingredients makes a big difference in the texture of your cupcakes.
Eggs and dairy that are too cold can cause the batter to curdle, leading to uneven baking.
To avoid this, let your eggs and buttermilk (or milk) sit at room temperature for about 30 minutes before mixing.
This ensures smoother incorporation and a more consistent batter.
Measuring Ingredients
Accurate measurements are key to achieving the right texture.
Use measuring cups and spoons specifically designed for baking, and follow these tips:
- Flour: Spoon it into the measuring cup and level it off with a flat edge to avoid packing too much.
- Cocoa Powder: Scoop lightly and level it off without compressing.
- Wet Ingredients: Use a liquid measuring cup for accuracy.
Storage and Shelf Life
Proper storage ensures your mini chocolate cupcakes stay fresh and delicious for as long as possible.
Follow these guidelines for both unfrosted and frosted cupcakes.
Unfrosted Cupcakes
Room Temperature
Store unfrosted cupcakes in an airtight container at room temperature for up to 2 days.
Keep them away from direct sunlight or heat to prevent drying out.
Refrigeration
If you need to store them longer, refrigerate the cupcakes in an airtight container for up to 1 week.
This will keep them fresh, but let them come to room temperature before adding frosting for the best results.
Freezing
To freeze unfrosted cupcakes, place them in a freezer-safe container or tightly wrap them in plastic wrap and aluminum foil.
They can be frozen for up to 3 months.
When ready to use, thaw them in the refrigerator overnight, then bring them to room temperature before frosting.
Frosted Cupcakes
Refrigeration
Frosted cupcakes should be stored in the refrigerator in a well-sealed container to maintain freshness and prevent the frosting from melting.
They will stay good for up to 3-4 days.
Serving Tip
For the best flavor and texture, allow refrigerated frosted cupcakes to sit at room temperature for 20-30 minutes before serving.
This helps soften the frosting and enhances the overall taste.
Variations and Substitutions
Here are some ways to adapt the recipe without compromising flavor or texture.
Flavor Variations
- Add Mini Chocolate Chips or Nuts: For extra texture and flavor, mix a handful of mini chocolate chips or chopped nuts into the batter. These add delightful bursts of flavor and crunch to each bite.
- Incorporate Espresso Powder: Enhance the chocolate flavor by adding 1 teaspoon of espresso powder to the dry ingredients. It deepens the richness of the cocoa without making the cupcakes taste like coffee.
Dietary Substitutions
- Gluten-Free Option: Replace the all-purpose flour with a 1:1 gluten-free flour blend designed for baking. This ensures the cupcakes maintain their structure and moist texture.
- Dairy-Free Option: Swap out the buttermilk or milk for a dairy-free alternative like almond milk, oat milk, or soy milk. Use vegan butter in place of regular butter for frosting or batter.
- Vegan Adaptation: Replace eggs with flax eggs (1 tablespoon ground flaxseed mixed with 2.5 tablespoons water per egg). Let the mixture sit for a few minutes until it thickens before adding it to the wet ingredients.
Conclusion
Mini chocolate cupcakes are a delightful treat that anyone can enjoy.
With their rich flavor, easy preparation, and endless customization options, they’re perfect for any occasion.
Give this recipe a try and see how simple it is to make these bite-sized delights at home.
Don’t forget to share your results and any creative twists you’ve added—we’d love to hear your feedback!
FAQs
Can I use this recipe for standard-sized cupcakes?
Yes, this recipe works perfectly for standard-sized cupcakes.
Simply adjust the baking time to 18-21 minutes at 350°F (175°C).
Use a toothpick to check for doneness; it should come out clean or with a few moist crumbs.
How can I make buttermilk at home?
Making buttermilk is simple and requires only two ingredients.
Combine 1 tablespoon of vinegar or lemon juice with 1 cup of milk.
Let the mixture sit for 5 minutes until it thickens slightly.
This substitute works just like store-bought buttermilk in the recipe.
Why add hot water or coffee to the batter?
Hot water or coffee is added to enhance the flavor and texture of the batter.
The heat helps dissolve the cocoa powder, intensifying the chocolate flavor.
Coffee, while optional, further amplifies the richness without making the cupcakes taste like coffee.
Additionally, it creates a smoother, more pourable batter for even baking.
Mini Chocolate Cupcakes: Rich, Moist, And Super Delicious!
24
servings15
minutes12
minutes90
kcal27
minutesRich, moist, and perfectly chocolaty, these mini chocolate cupcakes are bite-sized delights perfect for parties, snacks, or any celebration.
Ingredients
- For the Cupcakes
1 cup all-purpose flour
1/2 cup unsweetened cocoa powder
3/4 tsp baking powder
1/2 tsp baking soda
1/4 tsp salt
1/2 cup granulated sugar
1/2 cup packed light brown sugar
1/3 cup vegetable oil or melted butter
2 large eggs (room temperature)
1 tsp vanilla extract
1/2 cup buttermilk or milk
1/4 cup hot water or brewed coffee
- For the Chocolate Buttercream (Optional)
1/4 cup (1/2 stick) unsalted butter, softened
1/2 cup powdered sugar
1/4 cup cocoa powder
1/2 tsp vanilla extract
2 tbsp heavy cream or milk
Directions
- For the Cupcakes
- Preheat your oven to 350°F (175°C). Line a mini muffin pan with cupcake liners.
- In a large mixing bowl, whisk together the flour, cocoa powder, baking powder, baking soda, salt, granulated sugar, and brown sugar.
- In another bowl, whisk together the oil, eggs, vanilla extract, and buttermilk until smooth.
- Gradually add the wet ingredients to the dry ingredients, mixing gently until just combined. Avoid overmixing.
- Stir in the hot water or coffee to thin the batter. The batter will be slightly runny, which is normal.
- Spoon or pour the batter into the prepared liners, filling each about halfway to two-thirds full. Bake for 10-12 minutes, or until a toothpick inserted into the center comes out clean.
- Allow the cupcakes to cool in the pan for 2-3 minutes before transferring them to a wire rack to cool completely.
- For the Chocolate Buttercream (Optional)
- In a bowl, cream the softened butter until smooth.
- Gradually add the powdered sugar and cocoa powder, mixing on low speed until incorporated.
- Stir in the vanilla extract and heavy cream, then whip until light and fluffy.
- Pipe or spread the frosting onto the cooled cupcakes.
Notes
- For a dairy-free version, substitute buttermilk with almond, oat, or soy milk and use vegan butter in the frosting.
- To make gluten-free cupcakes, replace the all-purpose flour with a 1:1 gluten-free flour blend.
- Store unfrosted cupcakes in an airtight container at room temperature for up to 2 days, or freeze for up to 3 months.
- Frosted cupcakes can be refrigerated for 3-4 days but should be brought to room temperature before serving for the best flavor.